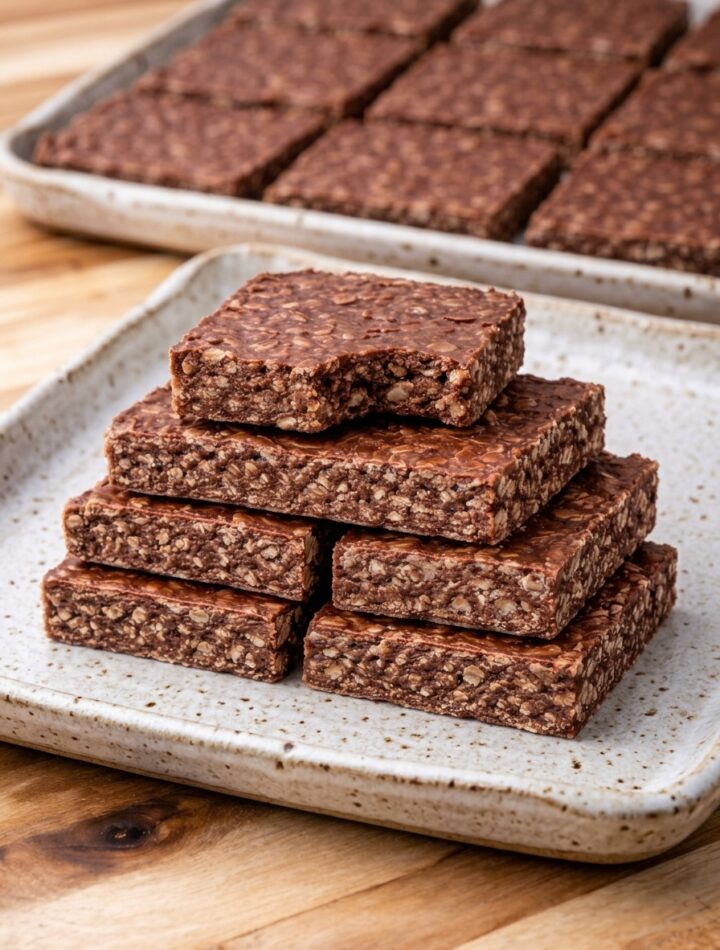
No-Bake Chocolate Crunch Bars are one of the easiest and most satisfying homemade desserts you can prepare with minimal effort and maximum flavor. These rich chocolate bars combine creamy melted chocolate with crispy crunchy ingredients to create a dessert that is sweet, crispy, chewy, and irresistibly delicious in every bite.
Perfect for busy days, holiday dessert trays, lunchbox treats, party platters, or late-night chocolate cravings, these easy no-bake bars have become a favorite among dessert lovers worldwide. Their crunchy texture, smooth chocolate coating, and simple preparation make them ideal for both beginner bakers and experienced home cooks.
Unlike traditional baked desserts that require ovens, mixers, and complicated techniques, no-bake chocolate crunch bars come together quickly using pantry-friendly ingredients and simple mixing methods. This makes them one of the most convenient homemade dessert recipes for families and busy households.
These chocolate crunch bars are especially popular among people searching for:
- Easy no-bake dessert recipe
- Chocolate crunch bars
- Crispy chocolate treats
- Homemade chocolate bars
- No-bake chocolate snacks
- Quick dessert bars
- Chocolate cereal bars
- Crunchy chocolate squares
- Kids’ chocolate dessert recipe
- Simple refrigerator desserts
The combination of smooth chocolate and crispy texture creates a dessert that feels both comforting and exciting at the same time.
Why No-Bake Chocolate Crunch Bars Are So Popular
No-bake desserts continue to trend because they save time while still delivering rich flavor and beautiful presentation. Chocolate crunch bars are especially loved because they are easy to customize and require very little preparation.
People love these bars because they are:
- Quick and easy to make
- Rich and chocolatey
- Crunchy and satisfying
- Kid-friendly
- Great for parties
- Perfect for make-ahead desserts
- Freezer-friendly
- Beginner-friendly
These bars also require no special baking skills, making them ideal for home cooks of all experience levels.
What Makes Chocolate Crunch Bars So Addictive?
The magic of these dessert bars lies in the contrast between silky melted chocolate and crispy crunchy textures.
The bars usually combine ingredients like:
- Melted chocolate
- Crispy cereal
- Crushed cookies
- Rice crisps
- Nuts
- Peanut butter
- Marshmallows
- Caramel
This balance of creamy and crunchy textures creates a highly satisfying dessert experience.
The Rise of No-Bake Desserts
No-bake desserts became especially popular because they are convenient and versatile. Many families prefer refrigerator desserts because they require less effort while still feeling indulgent.
No-bake chocolate desserts are especially appealing during warm weather because they avoid the need to turn on the oven.
Popular no-bake treats include:
- Chocolate biscuit cakes
- Icebox cakes
- Cheesecake bars
- Chocolate truffles
- Refrigerator fudge
- Crunch bars
Chocolate crunch bars stand out because they combine nostalgia, simplicity, and irresistible texture.
Essential Ingredients for Chocolate Crunch Bars
Every ingredient contributes to the texture and flavor of these crunchy dessert bars.
Chocolate
Chocolate forms the rich base that binds everything together. Milk chocolate creates sweeter bars, while dark chocolate adds deeper flavor.
Using high-quality chocolate improves taste and texture significantly.
Crunchy Mix-Ins
Crunchy ingredients create the signature crisp texture.
Popular options include:
- Crispy rice cereal
- Cornflakes
- Crushed digestive biscuits
- Graham crackers
- Pretzel pieces
- Toasted oats
Butter
Butter helps create smooth melted chocolate and enhances richness.
Sweeteners
Honey, maple syrup, or powdered sugar may be added depending on the recipe style.
Peanut Butter or Nut Butter
Nut butter adds creaminess and deeper flavor while helping bind the bars.
Optional Additions
Chocolate crunch bars can also include:
- Chopped nuts
- Mini marshmallows
- Dried fruits
- Coconut flakes
- Chocolate chips
- Caramel drizzle
- Sea salt
These additions create extra flavor and texture.
Why Homemade Chocolate Crunch Bars Taste Better
Homemade desserts often taste fresher and more flavorful than packaged snacks.
Making chocolate crunch bars at home allows you to:
- Choose better chocolate
- Adjust sweetness
- Add favorite toppings
- Customize texture
- Avoid preservatives
- Create healthier variations
Fresh homemade bars also maintain better crunch and richer chocolate flavor.
Texture and Flavor Profile
The best no-bake chocolate crunch bars should be:
- Crispy and crunchy
- Richly chocolatey
- Slightly chewy
- Smooth and creamy
- Sweet but balanced
The contrast between crunchy cereal and silky chocolate is what makes these bars so enjoyable.
Tips for Perfect No-Bake Crunch Bars
Melt Chocolate Slowly
Chocolate should be melted gently to prevent burning or grainy texture.
Use Fresh Crunchy Ingredients
Fresh cereal or cookies maintain better crispness.
Mix Quickly
Combine ingredients while the chocolate mixture is still warm and smooth.
Press Evenly into the Pan
Firm pressing helps the bars hold together after chilling.
Chill Properly
Refrigerating allows the bars to set firmly for clean slicing.
Best Chocolate Choices
Different types of chocolate create different flavor profiles.
Milk Chocolate
Sweeter and creamier.
Dark Chocolate
Rich, intense, and slightly less sweet.
Semi-Sweet Chocolate
Balanced sweetness and cocoa flavor.
White Chocolate
Creamy and buttery for sweeter dessert variations.
Combining multiple chocolates can create more depth.
Creative Flavor Variations
Chocolate crunch bars are highly customizable.
Peanut Butter Crunch Bars
Add creamy peanut butter for nutty richness.
Rocky Road Crunch Bars
Include marshmallows and nuts.
Salted Caramel Bars
Drizzle caramel and sprinkle sea salt.
Coconut Chocolate Bars
Mix in toasted coconut flakes.
Espresso Chocolate Crunch
Add espresso powder to intensify chocolate flavor.
Holiday Crunch Bars
Decorate with festive sprinkles or crushed candy pieces.
Best Occasions for Serving Chocolate Crunch Bars
These easy dessert bars work beautifully for many occasions.
Birthday Parties
Kids and adults both enjoy crunchy chocolate treats.
Holiday Dessert Trays
Cut into bite-sized squares for festive platters.
Lunchbox Treats
Portable and easy to pack.
Movie Nights
Perfect sweet snack for sharing.
Bake Sales and Potlucks
Easy to transport and serve.
Nutritional Benefits of Homemade Crunch Bars
While indulgent, homemade bars may still offer some nutritional advantages depending on ingredients used.
Possible benefits include:
- Energy from carbohydrates
- Protein from nuts or nut butter
- Antioxidants from dark chocolate
- Fiber from oats or cereals
Using dark chocolate and nuts can create a more balanced dessert.
Common Mistakes to Avoid
Overheating Chocolate
Burned chocolate becomes grainy and bitter.
Adding Too Many Dry Ingredients
Too much cereal may prevent the bars from holding together.
Skipping Pan Lining
Lining the pan makes removal and slicing easier.
Not Chilling Long Enough
Bars need time to fully set before slicing.
How to Slice Chocolate Crunch Bars Cleanly
For perfect clean edges:
- Chill completely before cutting
- Use a sharp knife
- Wipe the blade between cuts
- Slightly warm the knife if necessary
These simple tricks improve presentation significantly.
Storage Tips
Refrigerator Storage
Store bars in an airtight container for up to one week.
Freezer Storage
Freeze bars for up to two months.
Separate layers with parchment paper to prevent sticking.
Why Families Love This Recipe
Chocolate crunch bars are especially family-friendly because they are:
- Easy to prepare
- Fun for children to help make
- Great for sharing
- Budget-friendly
- Customizable
- Perfect for sweet cravings
Children especially enjoy mixing ingredients and decorating the bars.
Making Crunch Bars Healthier
Healthier variations can easily be created by:
- Using dark chocolate
- Reducing sweeteners
- Adding nuts and seeds
- Using natural nut butter
- Choosing whole-grain cereals
These simple swaps maintain flavor while improving nutrition.
Elegant Presentation Ideas
To elevate the appearance of homemade crunch bars:
- Drizzle melted chocolate on top
- Add sea salt flakes
- Decorate with edible gold dust
- Sprinkle crushed nuts
- Add chocolate curls
These details make the bars look bakery-quality.
Why No-Bake Desserts Continue to Trend
Modern home cooks appreciate recipes that are simple, fast, and reliable.
No-bake desserts are especially attractive because they:
- Require minimal equipment
- Save preparation time
- Produce consistent results
- Are beginner-friendly
- Work well for meal prep
Chocolate crunch bars perfectly represent this modern dessert trend.
Final Thoughts
No-Bake Chocolate Crunch Bars are the perfect combination of rich chocolate flavor and crispy crunchy texture. Easy to prepare and endlessly customizable, these homemade dessert bars are ideal for everything from casual snacking to elegant entertaining.
Whether enjoyed as a quick sweet treat, lunchbox dessert, holiday snack, or party favorite, these crunchy chocolate bars deliver satisfying texture and indulgent flavor in every bite. Simple ingredients, easy preparation, and irresistible crunch make this one of the best no-bake dessert recipes to keep in your collection year-round.
Part 2: Easy No-Bake Chocolate Crunch Bars Recipe
Ingredients
For the Chocolate Base
- 2 cups milk chocolate or semi-sweet chocolate chips
- 2 tablespoons butter
- ¼ cup peanut butter or almond butter
- 2 tablespoons honey or maple syrup
For the Crunchy Texture
- 3 cups crispy rice cereal or crushed cornflakes
- ½ cup crushed digestive biscuits or graham crackers
Optional Add-Ins
- ¼ cup mini marshmallows
- ¼ cup chopped walnuts or almonds
- 2 tablespoons coconut flakes
- Pinch of sea salt
Instructions
Step 1: Prepare the Pan
Line a square baking dish or loaf pan with parchment paper for easy removal.
Step 2: Melt the Chocolate Mixture
In a saucepan over low heat or using a microwave, melt the chocolate, butter, peanut butter, and honey together until smooth and glossy.
Step 3: Add Crunchy Ingredients
Remove from heat and stir in the crispy rice cereal and crushed biscuits until evenly coated.
Fold in marshmallows, nuts, or coconut if using.
Step 4: Transfer to the Pan
Pour the mixture into the prepared pan and press evenly using a spatula or the back of a spoon.
Step 5: Chill Until Firm
Refrigerate for at least 2–3 hours or until fully set.
Step 6: Slice and Serve
Cut into bars or squares and serve chilled or at room temperature.
Storage Tips
- Store in an airtight container in the refrigerator for up to 1 week.
- Freeze for up to 2 months.
- Keep chilled during warm weather for best texture.