The Ultimate Secret-Recipe Crispy Fried Chicken: Recreating the Legendary 11-Spice Fast-Food Classic at Home
Part 1: The Ultimate Home Cook’s Guide to Mastering Legendary 11-Spice Crispy Fried Chicken
There is an undeniable, universal nostalgia attached to the golden, ultra-crunchy, and intensely savory bite of classic southern-style fried chicken. For generations, fast-food aficionados have tried to decode the legendary, closely guarded proprietary blend of herbs and spices that defines the world’s most famous bucket of chicken. While commercial corporate kitchens utilize massive pressure fryers and industrial equipment, achieving that exact same iconic flavor profile, crackling crust, and extraordinarily succulent interior right in your home kitchen is entirely possible.
By combining the right science of protein tenderization, a precise ratio of aromatic botanicals and spices, and accurate thermal control using standard home cookware like a Dutch oven, you can create a culinary masterpiece that rivals—and often surpasses—the original. This comprehensive guide will walk you through every nuance of crafting this iconic dish, ensuring that your homemade version delivers professional-grade results every single time.
The Culinary Science Behind the Crunch: Why This Method Works
To replicate a world-class fried chicken experience, you need to understand the interplay between three critical elements: moisture retention, crust adhesion, and oil thermodynamics.
1. The Power of the Buttermilk Acid-Base Matrix
Commercial chicken is prized for its melt-in-your-mouth juiciness. At home, this texture is achieved through a targeted dairy marinade. Buttermilk is mildly acidic (containing lactic acid), which gently breaks down tough muscle fibers on the outer layers of the chicken without turning the meat mushy like stronger citrus marinades might. Furthermore, the proteins in the buttermilk adhere to the surface of the chicken pieces, creating a sticky base layer that acts as an anchor for the seasoned flour coating. When the egg is whisked into the buttermilk, it introduces additional proteins that coagulate during the initial contact with hot oil, locking in natural juices and preventing the chicken from drying out during high-heat cooking.
2. The Complex Symphony of the 11-Spice Blend
The hallmark of authentic 11-spice chicken is its remarkable flavor balance. It is neither overwhelmingly hot nor purely salty; instead, it relies on a layered combination of earthy herbs, warming spices, pungent salts, and a robust backbone of white and black peppers.
- The Pepper Spectrum: Using both fine ground black pepper and a generous quantity of ground white pepper provides a sharp, earthy heat that lingers pleasantly on the palate without overpowering the delicate poultry flavor.
- The Aromatic Backbone: Dried thyme, basil, and oregano contribute a subtle herbaceous depth reminiscent of classic southern seasoning cabinets.
- The Umami Enhancers: Celery salt, garlic salt, and optional MSG (monosodium glutamate) trigger glutamate receptors on the tongue, amplifying the savory notes and delivering that unmistakable craveable fast-food savoriness.
- Color and Warmth: Paprika gives the crust its signature deep mahogany-golden hue, while ground ginger and yellow mustard add a faint, bright zing that cuts through the richness of the fried coating.
3. Thermal Management: Dutch Oven vs. Commercial Pressure Fryer
Commercial establishments use pressure fryers to trap steam inside the chicken while cooking it rapidly at lower temperatures, ensuring the meat cooks through while keeping the crust from burning. In a domestic kitchen, we replicate this dual-stage cooking method by pan-frying in a heavy-bottomed Dutch oven to establish a deeply crisp, golden exterior crust, followed by a gentle oven-finish on a wire rack. This guarantees that the internal temperature safely reaches the required culinary standard ($165^\circ\text{F}$ or $75^\circ\text{C}$) without over-browning or scorching the delicate spice coating.
Comprehensive Ingredient Breakdown
To execute this recipe with absolute precision, gather the following components. Every item plays a specific structural or flavor-enhancing role.
- Poultry Foundation:
- 1 whole fresh chicken (approximately 3.5 to 4 pounds), expertly butchered into 8 standard pieces (2 wings, 2 drumsticks, 2 thighs, and 2 split breasts). Bone-in, skin-on cuts are mandatory for optimal moisture and rich flavor development.
- The Tenderizing Marinade:
- 1 cup full-fat buttermilk (the acidity and fat content are critical for tenderization).
- 1 large farm-fresh egg, thoroughly beaten (adds structural protein to bind the breading).
- The Legendary 11-Spice Breading Blend:
- 2 cups unbleached all-purpose flour (forms the structural matrix of the crispy crust).
- 2 teaspoons fine sea salt or table salt.
- 1½ teaspoons dried thyme leaves (crushed slightly between your fingers to release essential oils).
- 1½ teaspoons dried sweet basil leaves.
- 1 teaspoon dried Mediterranean oregano.
- 1 tablespoon high-quality celery salt.
- 1 tablespoon freshly ground black pepper (medium grind).
- 1 tablespoon ground yellow mustard powder.
- ¼ cup sweet Hungarian paprika (provides color and mild earthy sweetness).
- 2 tablespoons garlic salt.
- 1 tablespoon ground ginger powder.
- 3 tablespoons premium ground white pepper (the secret signature kick).
- Frying Medium:
- Neutral high-smoke-point cooking oil, such as refined canola oil, peanut oil, or grapeseed oil (approximately 3 inches deep in your Dutch oven).
- The Ultimate Umami Finish (Optional):
- High-grade MSG seasoning (such as Accent or Ajinomoto) for an authentic fast-food flavor profile.
Essential Kitchen Equipment Checklist
Having your tools organized and ready before you begin will ensure a smooth, stress-free cooking process:
- Cast Iron or Enameled Dutch Oven: Heavy-bottomed and thick-walled to retain stable thermal energy.
- Deep-Frying Thermometer: Essential for monitoring and maintaining the precise oil temperature ($350^\circ\text{F}$ or $175^\circ\text{C}$).
- Mixing Bowls: At least two large mixing bowls (one for the buttermilk bath, one for the massive dry spice-and-flour blend).
- Baking Sheet and Oven-Safe Wire Rack: Crucial for allowing air circulation around the fried chicken while it finishes in the oven, keeping the crust crisp instead of soggy.
- Long-Handled Tongs: For safely lowering and turning chicken pieces in hot oil without splashing.
- Measuring Spoons and Cups: For exact spice ratios.
Step-by-Step Culinary Methodology
Phase 1: Crafting the Dry Coating and Marinade
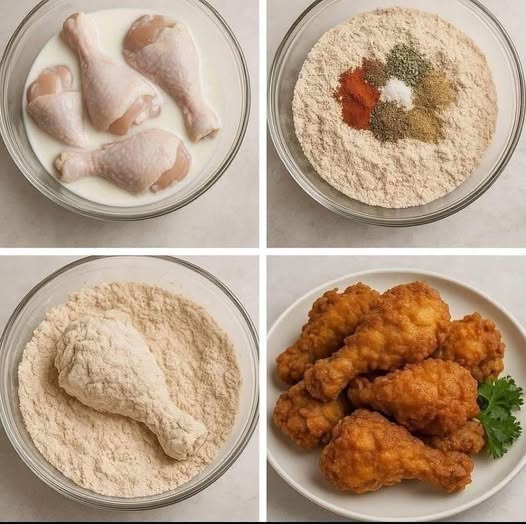
- Blend the Dry Spices: In your first large mixing bowl, combine the 2 cups of all-purpose flour with the salt, dried thyme, dried basil, dried oregano, celery salt, black pepper, yellow mustard powder, paprika, garlic salt, ground ginger, and white pepper. Whisk or sift the mixture thoroughly until the spices are completely homogenized throughout the flour. Set this aromatic blend aside.
- Prepare the Wet Marinade: In your second large bowl, whisk together the 1 cup of buttermilk and the beaten egg until fully combined and smooth.
- Initiate the Marinade Process: Submerge your 8 prepared chicken pieces into the buttermilk mixture, ensuring every surface is coated. Cover the bowl tightly and let it rest at room temperature for 25–30 minutes, or place it in the refrigerator for up to 8 hours (overnight marination yields the deepest tenderness and flavor infusion).
Phase 2: Thermal Setup and Breading Execution
- Preheat the Finishing Oven: Set your home kitchen oven to $175^\circ\text{F}$ ($80^\circ\text{C}$). Line a sturdy baking sheet with aluminum foil for easy cleanup, and place an oven-safe wire cooling rack directly on top of the sheet.
- Heat the Frying Medium: Pour neutral oil into your Dutch oven until it reaches a depth of about 3 inches. Clip your deep-frying thermometer to the side of the pot and heat the oil over medium heat until it registers precisely $350^\circ\text{F}$ ($175^\circ\text{C}$). Once reached, adjust your burner to medium-low to maintain a stable operating temperature.
- Coat the Chicken: Remove a piece of chicken from the buttermilk marinade, allowing any excess liquid to drip off briefly. Transfer the piece directly into the seasoned flour bowl. Press the flour firmly onto all sides of the chicken to ensure a thick, uniform coating. Shake off any loose, powdery excess, and place the coated piece on a clean plate. Tip: Do not let coated chicken sit for too long, or moisture from the meat will seep into the flour and create a gummy layer.
Phase 3: Precision Frying and Oven Finishing
- Batch Frying: Carefully lower 3 to 4 coated chicken pieces into the hot oil using your long tongs. Do not overcrowd the Dutch oven, as overloading causes a sudden temperature drop in the oil, leading to greasy, soggy breading.
- Monitor and Turn: Fry the chicken for approximately 12 minutes total, turning the pieces halfway through with your tongs. Watch for a rich, deep golden-brown crust and bubbling oil that signals active moisture release.
- Transfer to Warmth: Once the exterior is perfectly crisp and golden, remove the chicken pieces and transfer them immediately to the wire rack set over the baking sheet in your preheated $175^\circ\text{F}$ oven. This keeps the crust flawlessly crisp while allowing the interior meat to finish cooking gently.
- Regulate and Repeat: Allow your oil thermometer to climb back up to $350^\circ\text{F}$ before starting the next batch. Repeat the coating and frying process for the remaining chicken pieces.
- Final Doneness Check: Once all batches have been fried and placed on the wire rack, let them rest in the low oven until an instant-read digital thermometer inserted into the thickest part of the chicken (without touching bone) registers a safe internal temperature of $165^\circ\text{F}$ ($75^\circ\text{C}$).
- The Signature Finishing Touch: Just before plating and serving, lightly dust each piece of hot, ultra-crispy chicken with a tiny pinch of MSG seasoning for that unmistakable authentic fast-food umami punch.
Pro-Tips for Perfection
- Bone-In Advantage: Always choose bone-in, skin-on chicken thighs, drumsticks, and breasts. Boneless cuts dry out too quickly under high-heat frying conditions.
- Oil Temperature Discipline: If your oil is too hot ($>375^\circ\text{F}$), the exterior spices will scorch and turn bitter before the chicken cooks inside. If your oil is too cool ($<325^\circ\text{F}$), the crust will absorb excess oil and become greasy.
- The Wire Rack Secret: Never drain fried chicken on paper towels directly beneath the meat; trapped steam will soften the crust. Always use an elevated wire rack so air circulates freely underneath.
Part 2: Quick Recipe Card
A simplified, streamlined version of this legendary recipe for quick reference in the kitchen.
Description
A homemade version of the world’s most famous fried chicken featuring a secret blend of 11 herbs and spices. The chicken is marinated in buttermilk for supreme juiciness and fried to golden, ultra-crispy perfection.
Duration
- Prep Time: 15 minutes
- Marinating Time: 20 minutes to overnight
- Cooking Time: 12 minutes per batch (+ oven finishing time)
Ingredients
- 2 cups all-purpose flour
- 2 tsp salt
- 1½ tsp dried thyme
- 1½ tsp dried basil
- 1 tsp dried oregano
- 1 tbsp celery salt
- 1 tbsp black pepper
- 1 tbsp ground yellow mustard
- ¼ cup paprika
- 2 tbsp garlic salt
- 1 tbsp ground ginger
- 3 tbsp white pepper
- 1 cup buttermilk
- 1 large egg (beaten)
- 1 whole chicken, cut into 8 pieces
- Neutral oil for frying (canola or peanut oil)
- MSG seasoning (optional)
Instructions
- Combine Spices: Whisk all dry ingredients (flour and 11 spices) together in a large bowl.
- Marinate: Whisk buttermilk and beaten egg in a second bowl. Submerge chicken pieces and marinate for 20–30 minutes (or overnight in the fridge).
- Preheat Equipment: Heat your oven to $175^\circ\text{F}$ ($80^\circ\text{C}$) with a wire rack set over a foil-lined baking sheet. Heat 3 inches of oil in a Dutch oven to $350^\circ\text{F}$ ($175^\circ\text{C}$).
- Coat Chicken: Dredge marinated chicken pieces one by one in the seasoned flour mixture, pressing firmly to adhere.
- Fry in Batches: Fry 3 to 4 pieces at a time for about 12 minutes, turning halfway, until deep golden-brown and crispy.
- Keep Warm & Finish: Transfer fried chicken to the wire rack in the warm oven. Return oil to $350^\circ\text{F}$ between batches. Ensure internal meat temperature reaches $165^\circ\text{F}$ ($75^\circ\text{C}$) in the oven.
- Season & Serve: Sprinkle lightly with MSG (optional) immediately before serving.
Source
Adapted from classic southern culinary traditions and heritage fast-food copycat formulations designed for home Dutch oven cooking.