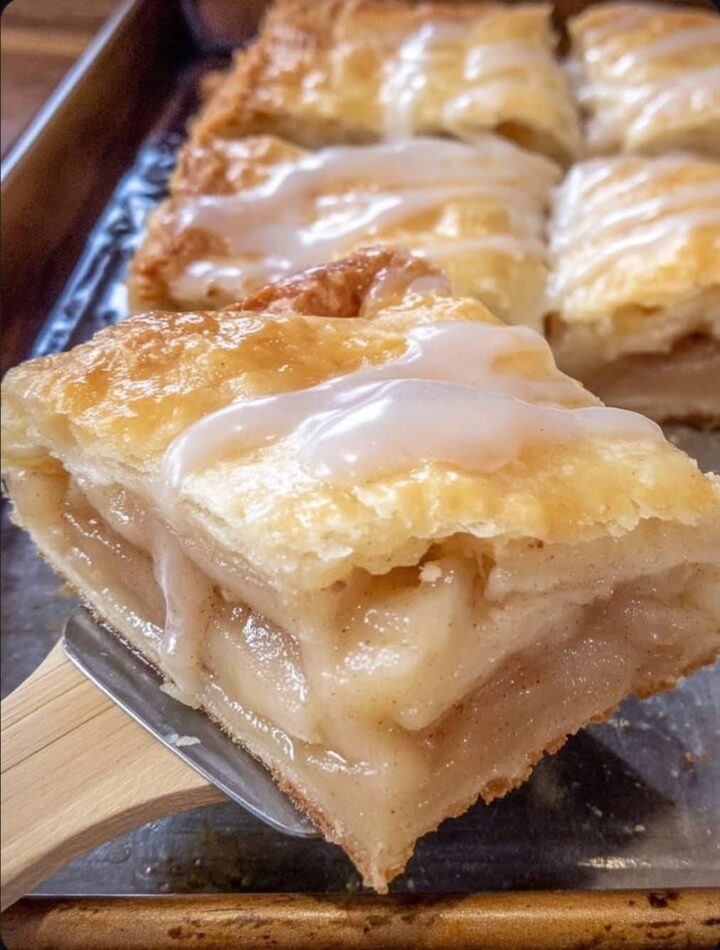
Few desserts capture the feeling of old-fashioned American bakery comfort quite like homemade Chicago-style apple slices. With their buttery pastry crust, rich apple filling, warm cinnamon flavor, and smooth vanilla glaze, these bakery-inspired apple bars are a timeless Midwestern favorite that continue to bring back memories for generations of families.
If you have ever visited a neighborhood bakery in the Chicago area, you may have seen large trays of golden apple pastries cut neatly into squares and stacked inside bakery boxes. These delicious treats were especially popular in family-owned bakeries throughout the city and surrounding suburbs during the twentieth century. Today, they remain one of the most nostalgic homemade apple desserts you can bake.
Unlike a traditional apple pie served in slices, Chicago bakery apple squares are designed to be portable, easy to share, and perfect for gatherings. They feature a sturdy yet flaky pastry crust layered with cinnamon-spiced apples and topped with a smooth vanilla icing that dries into a delicate sugary coating. Every bite combines buttery pastry, soft fruit filling, and sweet glaze in the perfect balance.
This authentic bakery-style apple dessert is ideal for holidays, brunches, potlucks, family dinners, weekend baking, or even a sweet breakfast pastry with coffee. Best of all, this recipe uses simple pantry staples while delivering bakery-quality flavor and texture at home.
In this complete guide, you will learn everything about making old-fashioned Chicago-style apple slices from scratch, including expert baking tips, ingredient details, storage advice, and ways to customize the recipe while keeping its classic bakery character intact.
What Makes Chicago Bakery Apple Slices Unique?
Many people compare these pastries to apple slab pie or sheet pan apple pie, but Chicago bakery apple slices have their own distinctive style and texture.
Traditional apple pie is usually baked in a deep round pie dish with a flaky crust and softer filling. Chicago bakery apple slices, however, are baked in a rectangular jelly roll pan which creates thinner layers and allows the dessert to be cut into hand-held squares.
Another key difference is the pastry dough itself. The crust is stronger and more structured than standard pie dough, helping the slices stay intact when picked up. The texture falls somewhere between classic pie crust and buttery pastry dough.
The final touch that truly defines these bakery apple slices is the sweet vanilla glaze spread across the warm top crust. As it cools, the icing forms a thin crackly layer that gives the pastry its iconic bakery appearance.
Because they are portable and easy to serve, these apple squares became popular choices for:
- Bakery counters
- Holiday dessert trays
- School events
- Potluck dinners
- Family brunches
- Coffee breaks
- Church gatherings
Their convenient square shape also makes them easier to transport than traditional pies.
Why You’ll Love This Homemade Apple Pastry Recipe
There are many reasons why these bakery apple slices continue to be one of the most beloved Midwestern desserts.
Large Batch Dessert for Gatherings
Because the recipe is baked in a sheet pan, it produces enough servings for parties, family events, and holiday celebrations.
Buttery Flaky Crust
The combination of butter and shortening creates a pastry crust that is both flavorful and tender while still sturdy enough to hold the filling properly.
Warm Cinnamon Apple Flavor
The apple filling is sweet, rich, and warmly spiced, creating that classic homemade bakery aroma everyone loves.
Easy to Slice and Serve
Unlike pies that require careful slicing, these dessert bars cut neatly into squares for easy serving.
Perfect for Make-Ahead Baking
These apple slices store and freeze beautifully, making them excellent for advance preparation.
Bakery-Style Vanilla Glaze
The sweet icing layer adds extra flavor while giving the pastry its traditional bakery finish.
The Secret Behind the Perfect Bakery Crust
One of the most important elements of authentic Chicago-style apple slices is the pastry dough. The crust must remain flaky while still supporting the apple filling without falling apart.
This recipe achieves that balance using a combination of carefully selected ingredients.
All-Purpose Flour
Regular all-purpose flour provides enough structure without making the crust overly tough.
Cold Butter
Butter adds rich flavor and helps create flaky layers during baking.
Vegetable Shortening or Lard
Many traditional bakeries used shortening or lard because it creates tenderness and stability. Combining shortening with butter gives the best texture.
Egg Yolks
Egg yolks enrich the dough and contribute to its golden color and slightly softer texture.
Lemon Juice
A small amount of acid helps relax gluten strands for a more tender pastry.
Ice Water
Cold water prevents the fats from melting before baking, which is essential for flaky pastry.
Choosing the Best Apples for Apple Slices
If you prefer making homemade apple filling instead of using canned pie filling, choosing the right apples matters.
The best baking apples include:
- Granny Smith apples
- Jonagold apples
- Honeycrisp apples
- Braeburn apples
- Northern Spy apples
These varieties hold their shape during baking and offer the perfect balance of sweetness and tartness.
Many bakers combine tart and sweet apples for more complex flavor.
Homemade Apple Filling Tips
While canned apple pie filling provides convenience and classic bakery texture, homemade filling can create an even fresher flavor.
For homemade filling:
- Peel and thinly slice the apples
- Cook them gently with sugar, cinnamon, and cornstarch
- Simmer until thickened
- Allow the mixture to cool completely before assembling
Cooling the filling prevents steam from softening the pastry dough.
Why Cold Ingredients Matter
Professional bakers know that temperature control is one of the secrets to successful pastry dough.
Keeping the butter, shortening, and water extremely cold ensures that small pieces of fat remain intact inside the dough. During baking, those cold fat pockets melt and create steam, forming flaky layers.
If your kitchen is warm, chilling the mixing bowl and utensils can also help.
How to Roll Dough Like a Bakery Professional
Large rectangular pastry sheets can seem intimidating, but a few simple tricks make the process easier.
Use Plenty of Flour
Lightly flour your work surface and rolling pin to prevent sticking.
Roll from the Center Outward
This helps maintain even thickness throughout the dough.
Rotate Frequently
Turning the dough while rolling prevents sticking and creates a more even rectangle.
Use the Rolling Pin Transfer Method
Carefully wrap the dough loosely around the rolling pin and unroll it directly into the pan.
If the dough tears, simply patch it with your fingers. The glaze will hide imperfections beautifully.
Creating the Signature Vanilla Glaze
The glaze is one of the most recognizable features of Chicago bakery apple slices.
Unlike runny icing, this glaze should spread smoothly while warm and then set into a slightly firm finish as it cools.
The combination of powdered sugar, butter, milk, and vanilla creates a rich bakery-style frosting with classic flavor.
For best results:
- Glaze the pastry while slightly warm
- Spread evenly from edge to edge
- Allow full cooling before slicing
This creates clean bakery-style squares.
Helpful Baking Tips for Perfect Results
Don’t Overmix the Dough
Overworking pastry dough develops gluten, leading to a tougher crust.
Mix only until the dough comes together.
Chill Before Rolling
Cold dough is easier to handle and bakes more evenly.
Vent the Top Crust
Small slits in the top allow steam to escape during baking.
Rotate the Pan Halfway Through Baking
This promotes even browning.
Cool Completely Before Cutting
Warm filling may spill out if sliced too early.
Patience gives cleaner squares and better texture.
Best Occasions for Chicago Apple Squares
These bakery apple bars work for nearly any occasion.
They are especially popular for:
- Thanksgiving desserts
- Christmas baking trays
- Fall gatherings
- Family reunions
- Potluck dinners
- Weekend brunches
- Bake sales
- Afternoon coffee treats
Because they transport easily, they are excellent for sharing.
Delicious Serving Suggestions
These apple pastries are wonderful on their own, but you can also pair them with:
- Vanilla ice cream
- Whipped cream
- Hot coffee
- Chai tea
- Caramel drizzle
- Cinnamon sugar
- Fresh whipped cream
For a bakery-style presentation, dust lightly with extra powdered sugar before serving.
Storage Instructions
Room Temperature
Store covered for up to two days.
Refrigerator
Keep refrigerated in an airtight container for up to five days.
Many people enjoy them chilled straight from the refrigerator.
Freezer
These pastries freeze very well.
To freeze:
- Cool completely
- Slice into squares
- Separate layers with parchment paper
- Store in freezer-safe containers
Freeze for up to three months.
Reheating Tips
You can enjoy the slices cold or slightly warmed.
To reheat:
- Microwave for 15–20 seconds
- Warm in oven at low temperature
- Use air fryer briefly for crispness
Avoid overheating to prevent glaze from melting completely.
Common Mistakes to Avoid
Warm Dough
Soft dough becomes sticky and difficult to roll.
Underbaking
The bottom crust may become soggy if removed too early.
Too Much Filling
Overfilling can cause leaking and uneven baking.
Cutting While Hot
The filling needs time to set fully.
Frequently Asked Questions
Can I use store-bought pie crust?
Yes. Refrigerated pie crust can save time and still produce delicious results.
Can I use other fruit fillings?
Absolutely. Cherry, peach, blueberry, and strawberry fillings all work wonderfully.
Why is my crust tough?
This usually happens from overmixing or adding too much water.
Can I make these ahead of time?
Yes. In fact, the flavor often improves the next day.
Do they need refrigeration?
They can stay at room temperature briefly, but refrigeration extends freshness.
Why This Recipe Feels So Nostalgic
Classic bakery recipes like these apple slices remind many people of childhood weekends, local bakeries, family gatherings, and holiday mornings.
The smell of warm apples, buttery pastry, cinnamon, and vanilla icing filling the kitchen creates a comforting homemade atmosphere that few desserts can match.
Even for people discovering them for the first time, these bakery apple bars deliver the cozy flavor of traditional American baking.
Final Thoughts
These homemade Chicago-style bakery apple slices are the perfect blend of flaky pastry, sweet cinnamon apples, and smooth vanilla glaze. Their nostalgic bakery flavor, easy-to-serve shape, and crowd-friendly size make them one of the best classic apple desserts you can bake.
Whether you serve them for holidays, brunch, potlucks, or casual family desserts, these apple pastry squares offer old-fashioned comfort in every bite.
Once you try this bakery-inspired recipe, it may become a permanent favorite in your dessert collection.
Part 2: Simple Chicago-Style Bakery Apple Slices Recipe
Classic Bakery Apple Squares
Preparation Time
- Prep Time: 35 minutes
- Chill Time: 30 minutes
- Bake Time: 35–40 minutes
- Total Time: About 1 hour 45 minutes
- Servings: 12–15 squares
Ingredients
For the Pastry Dough
- 2 ½ cups all-purpose flour
- ½ teaspoon baking powder
- ½ teaspoon kosher salt
- ½ cup unsalted butter, cold and cubed
- ½ cup vegetable shortening or lard, cold
- 2 large egg yolks
- 1 tablespoon fresh lemon juice
- ⅓ cup ice water, plus extra if needed
For the Apple Filling
- 32 ounces apple pie filling
For the Vanilla Glaze
- 1 ½ cups powdered sugar
- 3 tablespoons softened unsalted butter
- 1 teaspoon pure vanilla extract
- 2–3 tablespoons whole milk
Instructions
Step 1: Mix Dry Ingredients
In a large bowl, whisk together flour, baking powder, and salt.
Step 2: Cut in Butter and Shortening
Add cold butter and shortening. Use a pastry blender or forks to combine until crumbly.
Step 3: Combine Wet Ingredients
Whisk egg yolks, lemon juice, and ice water in a small bowl.
Step 4: Prepare Dough
Pour wet ingredients into flour mixture. Stir gently until dough forms.
Divide dough into two portions, flatten into rectangles, wrap, and chill for 30 minutes.
Step 5: Preheat Oven
Preheat oven to 400°F (200°C).
Step 6: Roll Bottom Crust
Roll one dough portion into a large rectangle and place into a 9×13-inch jelly roll pan.
Press lightly into the pan.
Step 7: Add Apple Filling
Spread apple pie filling evenly over the crust.
Step 8: Add Top Crust
Roll remaining dough and place over apples.
Seal edges and cut small slits on top.
Step 9: Bake
Bake for 35–40 minutes until golden brown.
Cool slightly on a wire rack.
Step 10: Prepare Glaze
Whisk powdered sugar, butter, vanilla, and milk until smooth.
Step 11: Glaze and Cool
Spread glaze evenly over warm pastry.
Allow to cool completely before slicing into squares.
Storage Tips
- Store covered at room temperature for 2 days
- Refrigerate up to 5 days
- Freeze up to 3 months