There are times when you want a warm slice of homemade bread but don’t have the patience for kneading dough, waiting for yeast to activate, or preheating the oven. That’s where this quick microwave mug bread comes to the rescue. This fast and easy bread recipe delivers a soft, tender texture using simple pantry staples and a microwave. In just a few minutes, you can enjoy freshly made bread that pairs beautifully with breakfast spreads, soups, salads, or savory meals.
As more people search for easy homemade bread recipes, microwave bread recipes, single-serving bread ideas, and no-yeast bread alternatives, this mug bread has become a favorite among busy families, students, office workers, and beginner cooks. The recipe is straightforward, requires minimal equipment, and creates virtually no mess.
Unlike traditional bread-making methods that can take hours, this quick bread uses baking powder as the leavening agent, eliminating the need for yeast and proofing time. The result is a fluffy, satisfying bread that can be prepared whenever a craving strikes.
Why Microwave Bread Has Become So Popular
Modern lifestyles often leave little time for lengthy baking projects. Microwave bread offers a convenient alternative while still providing the comfort of homemade baking.
Fast Preparation
One of the biggest advantages of microwave mug bread is speed. Traditional bread recipes may require several hours from mixing to baking. This recipe takes only a few minutes from start to finish.
No Yeast Needed
Many people avoid bread making because yeast can seem intimidating. Since this recipe relies on baking powder, there is no need to worry about activating yeast, proofing dough, or maintaining the proper temperature.
Beginner-Friendly Method
Even if you’ve never baked bread before, this recipe is easy to master. The ingredients are mixed directly in a mug, reducing preparation time and cleanup.
Small Batch Convenience
Sometimes you only need one serving of bread. This recipe creates the perfect amount for an individual portion, helping reduce food waste and unnecessary leftovers.
Budget-Friendly Ingredients
The recipe uses common kitchen staples that most households already keep on hand, making it both economical and accessible.
The Secret Behind Soft and Fluffy Microwave Bread
Although microwave bread differs slightly from oven-baked bread, the right combination of ingredients creates a surprisingly pleasant texture.
The flour provides structure, while the baking powder produces tiny air pockets that help the bread rise during cooking. Milk adds moisture, and the oil or butter keeps the crumb soft and tender.
When combined properly, these ingredients work together to create a bread that is light, moist, and enjoyable for both sweet and savory applications.
Understanding the Main Ingredients
Every ingredient serves an important purpose in achieving the best results.
Wheat Flour
Wheat flour acts as the foundation of the bread. It creates the structure necessary for a stable crumb while maintaining softness.
For those who prefer a more wholesome option, whole wheat flour can be substituted. A combination of all-purpose flour and whole wheat flour also works well, providing a balance between flavor and texture.
Baking Powder
Baking powder is the key rising ingredient in this recipe. Because there is no yeast, baking powder creates the lift needed to produce a fluffy bread texture.
Always use fresh baking powder for the best rise and consistent results.
Salt
A small amount of salt significantly improves flavor. It balances the ingredients and enhances the natural taste of the bread.
Milk
Milk contributes moisture and softness. Full-fat milk often creates the richest texture, but low-fat milk can also be used successfully.
For dairy-free versions, unsweetened plant-based milk alternatives such as almond milk, soy milk, or oat milk can be substituted.
Oil or Melted Butter
Adding fat helps prevent dryness and improves tenderness.
Vegetable oil creates a softer crumb, while melted butter contributes a richer flavor and aroma. Both options produce excellent results.
Optional Nutrient-Rich Additions
While the original recipe works perfectly on its own, these authentic additions can increase flavor and nutrition:
- Chia seeds
- Ground flaxseed
- Sunflower seeds
- Sesame seeds
- Pumpkin seeds
- Dried herbs
- Finely grated cheese
These ingredients complement the bread without altering its core structure.
Benefits of Making Bread in a Mug
Microwave mug recipes have gained popularity because they solve several common cooking challenges.
Perfect for Busy Schedules
Whether you’re preparing breakfast before work or a late-night snack, this recipe fits into even the busiest routine.
Energy Efficient Cooking
Using a microwave requires less energy than heating a full-sized oven for a single serving.
Great for Dorms and Small Apartments
Students and apartment dwellers often have limited kitchen space. A microwave and a mug may be all that’s needed.
Less Cleanup
Since the ingredients are mixed and cooked in the same container, cleanup is quick and simple.
Consistent Results
Once you determine the ideal cooking time for your microwave, the recipe becomes highly reliable and repeatable.
Expert Tips for the Best Microwave Mug Bread
Simple techniques can help improve texture and flavor.
Mix Thoroughly
Ensure all ingredients are fully incorporated. Dry flour pockets can affect the final texture and cooking consistency.
Select a Large Mug
The batter expands as it cooks. Choose a microwave-safe mug that allows enough room for rising.
Avoid Overcooking
Microwave power levels vary. Excess cooking time can make the bread rubbery or dry.
Start with the shortest recommended cooking time and add small increments if necessary.
Let the Bread Cool Briefly
Allowing the bread to rest for about one minute after cooking improves texture and makes slicing easier.
Use Fresh Ingredients
Fresh baking powder produces better lift and a lighter crumb.
Delicious Flavor Variations to Try
One of the most appealing aspects of microwave bread is its versatility.
Garlic and Herb Bread
Transform the basic recipe into a savory side dish by adding:
- Garlic powder
- Dried oregano
- Italian herb seasoning
- Dried parsley
This version pairs wonderfully with soups, pasta dishes, and roasted vegetables.
Cheese Lover’s Bread
Stir in grated cheddar, mozzarella, parmesan, or a blend of cheeses for extra richness and flavor.
Cinnamon Breakfast Bread
For a sweeter option, add:
- A small amount of sugar
- Ground cinnamon
- A few drops of vanilla extract
Serve warm with butter, cream cheese, or honey.
Spicy Mug Bread
If you enjoy heat, incorporate:
- Crushed red pepper flakes
- Black pepper
- Paprika
This variation works especially well with savory meals.
Seeded Whole Grain Bread
Boost nutrition by adding a mixture of:
- Sesame seeds
- Flaxseeds
- Chia seeds
- Sunflower seeds
The seeds contribute texture, healthy fats, and additional fiber.
Creative Ways to Serve Microwave Bread
This bread is incredibly adaptable and can be enjoyed throughout the day.
Breakfast Serving Ideas
Enjoy warm with:
- Butter
- Fruit preserves
- Honey
- Peanut butter
- Cream cheese
Lunch Pairings
Serve alongside:
- Vegetable soup
- Chicken soup
- Fresh salads
- Sandwich fillings
Dinner Accompaniments
Pair with:
- Pasta recipes
- Curry dishes
- Stews
- Roasted vegetables
Healthy Snack Options
Top with:
- Avocado
- Hummus
- Cottage cheese
- Sliced tomatoes
Common Errors and How to Avoid Them
Adding Too Much Flour
Excess flour can create dense bread. Measure carefully for the best texture.
Using Old Baking Powder
Expired baking powder may prevent proper rising.
Overmixing the Batter
Mix until smooth, but avoid excessive stirring once combined.
Cooking for Too Long
The most common issue with microwave bread is overcooking. Monitor closely and adjust based on your microwave’s power.
Choosing a Small Mug
Insufficient space can cause the batter to overflow during cooking.
Frequently Asked Questions
Can I use whole wheat flour?
Yes. Whole wheat flour provides a nuttier flavor and additional fiber.
Can I make this dairy-free?
Absolutely. Plant-based milk alternatives work well in this recipe.
How can I tell when the bread is ready?
The surface should appear set, and the bread should spring back lightly when touched.
Can I prepare a larger batch?
Yes. Simply scale the ingredients and use a larger microwave-safe container while adjusting cooking time accordingly.
Is oil better than butter?
Both work well. Oil creates a softer texture, while butter adds richer flavor.
Final Thoughts
This easy microwave mug bread is proof that homemade bread doesn’t need to be complicated. With only a handful of ingredients and a few minutes of preparation, you can enjoy fresh, warm bread anytime. The recipe is ideal for busy lifestyles, small kitchens, beginner bakers, and anyone looking for a quick bread solution.
Its versatility allows endless customization, from savory herb-infused versions to sweet breakfast-inspired creations. Once you master the basic method, you can experiment with your favorite seasonings, cheeses, seeds, and toppings to create countless delicious variations.
Whether served for breakfast, lunch, dinner, or as a snack, this microwave bread offers convenience, comfort, and homemade flavor in every bite.
Part 2: Quick Microwave Mug Bread Recipe
Preparation Time
2 minutes
Cooking Time
1–2 minutes
Total Time
3–4 minutes
Yield
1 serving
Ingredients
- 4 tablespoons wheat flour
- ½ teaspoon baking powder
- Pinch of salt
- 3 tablespoons milk
- 1 tablespoon oil or melted butter
Optional Flavor Boosters
- Garlic powder
- Mixed dried herbs
- Grated cheddar, mozzarella, or parmesan cheese
- Cinnamon and a small amount of sugar
- Sesame seeds
- Flaxseeds
- Chia seeds
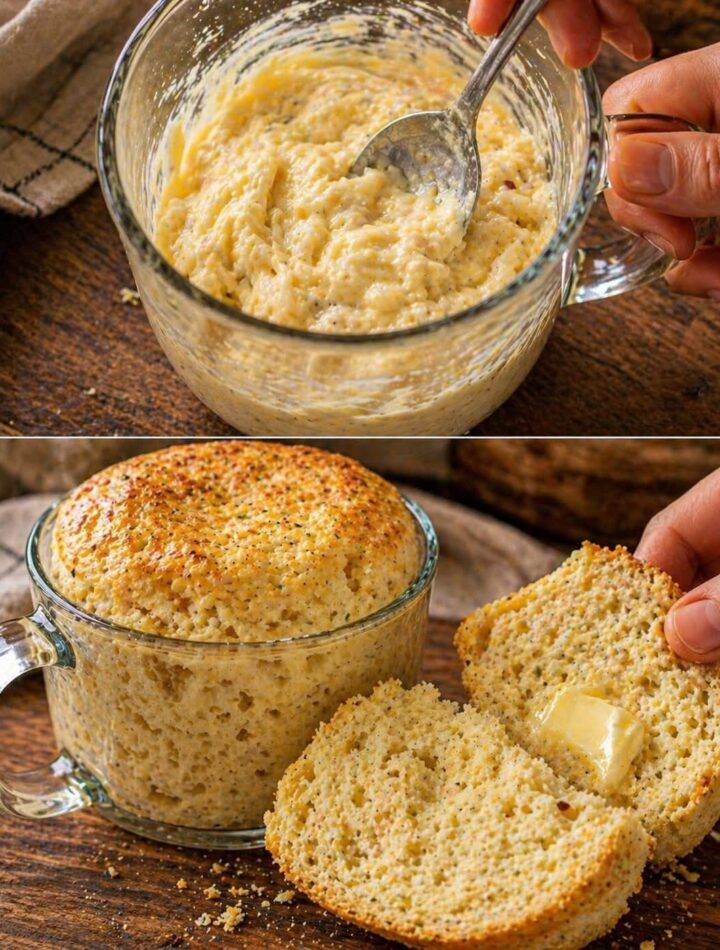
Directions
- Place the wheat flour, baking powder, and salt into a microwave-safe mug.
- Stir until the dry ingredients are evenly blended.
- Pour in the milk and oil or melted butter.
- Mix thoroughly until a smooth batter forms without any dry flour remaining.
- Microwave on high power for 60 to 90 seconds.
- Check the center for doneness. If needed, continue cooking in 10 to 15-second intervals.
- Let the bread rest for 1 minute before serving.
- Enjoy warm with your preferred toppings or side dishes.
Serving Suggestions
- Butter
- Honey
- Fruit jam
- Cream cheese
- Peanut butter
- Avocado
- Soup
- Salad
- Eggs
- Cheese spread