The Ultimate Guide to Making Light and Airy Glazed Donuts at Home
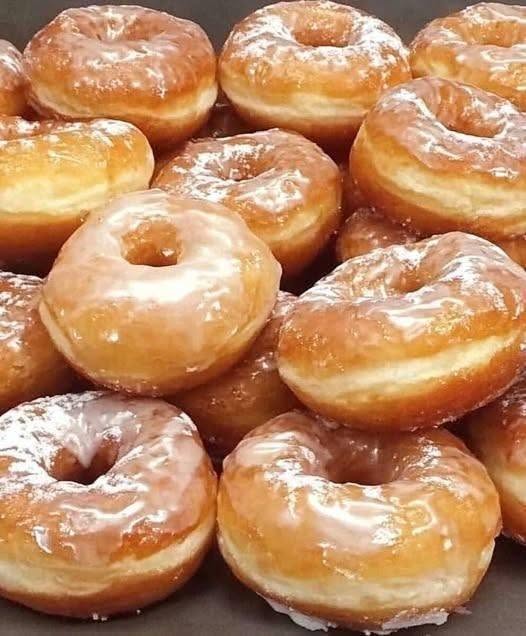
There is something truly special about biting into a freshly made glazed donut. The delicate golden exterior gives way to a pillowy-soft center, while the sweet vanilla glaze creates a melt-in-your-mouth finish that keeps you reaching for another bite. These homemade glazed yeast donuts deliver the same bakery-style texture and flavor that donut lovers crave, yet they can be made right in your own kitchen using simple pantry ingredients.
Unlike cake donuts, yeast-raised donuts are known for their airy structure, fluffy crumb, and irresistible softness. The secret lies in properly activated yeast, careful dough preparation, and allowing enough time for the dough to rise. When done correctly, the result is a batch of tender donuts that are light enough to float and rich enough to satisfy any sweet tooth.
Whether you’re preparing a special breakfast, weekend brunch, holiday dessert table, or simply treating your family to a homemade indulgence, these classic glazed donuts are a wonderful choice. Their signature sweet glaze coats each donut with a glossy finish that hardens slightly while remaining deliciously soft.
Why You’ll Love This Homemade Donut Recipe
Making donuts from scratch may seem intimidating at first, but this recipe is surprisingly approachable. Every step has been designed to help home bakers achieve bakery-quality results without requiring professional equipment.
Here are some reasons these glazed donuts stand out:
- Soft and fluffy texture with a light interior.
- Perfectly sweet vanilla glaze.
- Easy-to-find ingredients.
- Great for breakfast, dessert, or special occasions.
- Authentic yeast donut flavor.
- Freezer-friendly dough option.
- Customizable with toppings and fillings.
The combination of milk, butter, sugar, and egg creates a rich dough that fries beautifully while remaining tender inside. The glaze adds just the right amount of sweetness without overwhelming the delicate flavor of the donut itself.
Understanding the Key Ingredients
Creating exceptional homemade donuts begins with understanding the role each ingredient plays in the recipe.
All-Purpose Flour
All-purpose flour provides the structure needed for soft yet stable donuts. It contains enough protein to develop gluten while maintaining a tender texture. Proper kneading helps create elasticity, which contributes to the fluffy interior.
Whole Milk
Warm milk helps activate the yeast and adds richness to the dough. The natural fats in whole milk contribute to a softer crumb and more flavorful finished product.
Water
Water works alongside milk to create the proper moisture balance. Lukewarm water also supports healthy yeast activation.
Active Dry Yeast
Yeast is responsible for creating the airy structure that makes these donuts so light. As it feeds on sugars in the dough, it releases carbon dioxide, producing the characteristic rise and fluffy texture.
Granulated Sugar
Sugar not only sweetens the dough but also helps feed the yeast and encourages beautiful browning during frying.
Egg
A room-temperature egg enriches the dough, enhances flavor, and improves overall texture. It also contributes to the soft interior crumb.
Butter
Butter adds richness and creates a tender, luxurious mouthfeel. Softened butter blends evenly into the flour mixture, helping achieve the desired donut texture.
Salt
Even a small amount of salt plays an important role by balancing sweetness and enhancing flavor.
Frying Oil
A neutral oil with a high smoke point is ideal for frying. Proper oil temperature helps create golden donuts without excessive oil absorption.
The Secret to Perfect Yeast Activation
One of the most important steps in successful donut making is activating the yeast properly. The milk and water should feel comfortably warm but never hot. Excessive heat can damage the yeast, preventing proper fermentation.
When yeast is combined with warm liquid, sugar, and a small amount of flour, it should become foamy and bubbly after several minutes. This indicates that the yeast is active and ready to help the dough rise.
Skipping this verification step can lead to dense donuts that fail to achieve the desired fluffy texture.
Building a Soft and Elastic Dough
Once the yeast mixture becomes active, it is incorporated into the flour mixture along with the remaining ingredients. During kneading, gluten develops throughout the dough, creating the elasticity necessary for a soft structure.
The dough should eventually become smooth, supple, and slightly tacky without being overly sticky. Proper kneading ensures that the donuts will rise beautifully and maintain their shape during frying.
Many experienced bakers recommend kneading until the dough stretches without tearing easily. This indicates sufficient gluten development.
Why Proofing Matters
Proofing, also known as rising, is essential for producing light donuts. During this stage, yeast continues to ferment and release gases that expand the dough.
The first rise allows the entire dough mass to increase in volume. This develops flavor while creating a softer texture.
After shaping, a second rise gives the donuts their final lift before frying. This stage contributes significantly to the characteristic airy interior found in bakery-quality yeast donuts.
Rushing either rise can result in heavy, dense donuts that lack the desired softness.
Shaping Bakery-Style Donuts
Once the dough has doubled in size, it is rolled out and cut into traditional donut shapes. A donut cutter makes the process easier, but round cutters of different sizes can also be used.
Uniform thickness is important because it ensures even cooking. Consistent shapes also create a more professional appearance.
The cut donuts should be handled gently to preserve the air pockets developed during proofing.
Frying Tips for Golden Perfection
The frying stage transforms the risen dough into delicious donuts with a crisp exterior and soft center.
Maintaining the correct oil temperature is crucial. If the oil is too hot, the outside may brown before the inside cooks fully. If the oil is too cool, the donuts can absorb excess oil and become greasy.
Frying a few donuts at a time helps maintain a stable temperature. Each donut should develop a beautiful golden-brown color on both sides.
Once removed from the oil, place the donuts on a wire rack or paper-lined tray to drain briefly before glazing.
Creating a Smooth Vanilla Glaze
The classic glaze is what gives these donuts their iconic finish. Combining confectioners’ sugar, milk, cream, and vanilla creates a silky coating that adheres beautifully to warm donuts.
The glaze should be smooth and pourable without being excessively thin. If needed, adjust the consistency with small amounts of milk or powdered sugar.
Dipping warm donuts into the glaze allows the coating to spread evenly and create a glossy finish.
Tips for the Best Homemade Donuts
Follow these expert recommendations for consistently excellent results:
Use Room-Temperature Ingredients
Room-temperature eggs and softened butter blend more easily into the dough.
Measure Carefully
Accurate measurements help maintain the correct dough consistency.
Avoid Excess Flour
Adding too much flour can create dense donuts. The dough should remain soft and slightly tacky.
Allow Full Rising Time
Proper proofing develops flavor and ensures a light texture.
Monitor Oil Temperature
Consistent frying temperatures help achieve evenly cooked donuts.
Glaze While Warm
Warm donuts absorb the glaze better and develop a beautiful finish.
Delicious Variations to Try
Although classic glazed donuts are always a favorite, you can customize this recipe in several ways.
Chocolate Glazed Donuts
Add cocoa powder to the glaze for a rich chocolate coating.
Cinnamon Sugar Donuts
Skip the glaze and toss warm donuts in cinnamon sugar.
Filled Donuts
Inject pastry cream, jam, or chocolate filling after frying.
Maple Glazed Donuts
Replace vanilla with maple flavoring for a sweet maple finish.
Sprinkled Celebration Donuts
Add colorful sprinkles immediately after glazing.
Storage and Freshness Tips
Homemade donuts taste best on the day they are prepared, but they can be stored in an airtight container at room temperature for up to two days.
For longer storage, freeze unglazed donuts and thaw before adding fresh glaze.
Avoid refrigeration, as it may dry out the donuts and reduce their soft texture.
Frequently Asked Questions
Why are my donuts dense?
Insufficient proofing, inactive yeast, or excessive flour can create dense donuts.
Can I make the dough ahead of time?
Yes. After the first rise, the dough may be refrigerated overnight and shaped the following day.
What oil is best for frying?
Neutral oils with high smoke points work best for even frying and clean flavor.
Can I bake these donuts instead?
While baking is possible, frying provides the authentic texture associated with traditional yeast-raised donuts.
Final Thoughts
These homemade glazed yeast donuts deliver everything donut lovers desire: a fluffy interior, golden exterior, and sweet vanilla glaze that melts in your mouth. With proper yeast activation, careful proofing, and gentle handling, you can create bakery-style donuts that rival those found in professional shops. Whether enjoyed with coffee in the morning or served as an afternoon treat, these freshly glazed donuts are guaranteed to become a family favorite.
Part 2: Quick Recipe Card
Soft & Fluffy Homemade Glazed Donuts
Ingredients
For the Donut Dough
- 2 cups all-purpose flour
- ¼ cup lukewarm whole milk
- ¼ cup lukewarm water
- 2 teaspoons active dry yeast
- 1 room-temperature egg
- 3 tablespoons granulated sugar
- ¼ cup softened butter
- Pinch of kosher salt
- Oil for deep frying
For the Vanilla Glaze
- 2 cups confectioners’ sugar
- ¼ cup lukewarm whole milk
- 2 tablespoons heavy cream
- 1 teaspoon vanilla extract
Method
Step 1: Wake Up the Yeast
In a bowl, combine warm milk, warm water, a small amount of flour, sugar, and yeast. Leave for 5–10 minutes until foamy and active.
Step 2: Prepare the Dry Base
In a separate mixing bowl, blend flour, salt, and softened butter until the mixture resembles fine crumbs.
Step 3: Form the Dough
Add the egg, remaining sugar, and activated yeast mixture to the flour blend. Knead until a smooth, stretchy dough forms.
Step 4: First Proof
Transfer dough to a lightly greased bowl. Cover and let rise in a warm place for about 1 hour or until doubled in volume.
Step 5: Cut the Donuts
Roll dough to an even thickness. Cut into donut shapes and place on a lined tray.
Step 6: Second Rise
Cover loosely and allow shaped donuts to puff up until noticeably larger.
Step 7: Fry Until Golden
Heat oil in a deep pan. Fry donuts in batches until golden brown on both sides. Drain on a wire rack.
Step 8: Mix the Glaze
Whisk confectioners’ sugar, milk, cream, and vanilla extract until silky smooth.
Step 9: Coat the Donuts
Dip warm donuts into the glaze or drizzle generously over the top.
Step 10: Serve Fresh
Allow the glaze to set briefly, then enjoy soft, bakery-style homemade glazed donuts.