Turning Simple Potatoes into a Gourmet Side Dish
Among all classic comfort foods, potatoes hold a special place in kitchens around the world. From mashed to fried and baked, they are incredibly versatile. But one preparation stands out for both its visual beauty and incredible texture—the Hasselback potato. This technique transforms an ordinary potato into a restaurant-style side dish with crispy edges and a soft, fluffy center.
If you’re searching for the perfect crispy baked potato recipe, this method delivers outstanding results every time. It’s not just about cooking—it’s about technique, precision, and understanding how heat and texture work together.
What Makes Hasselback Potatoes So Special
The magic of this dish lies in its unique slicing technique. Instead of cutting the potato completely, thin slices are made while keeping the base intact. This creates a fan-like structure that allows heat to circulate evenly.
This results in two distinct textures:
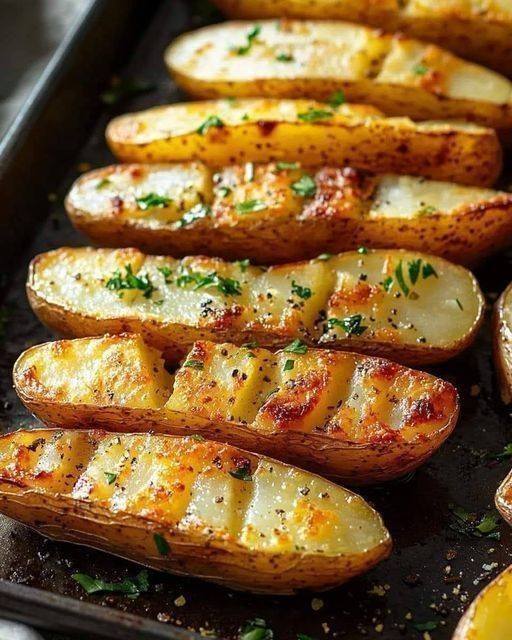
- Crispy outer edges: Each slice becomes golden and slightly crunchy
- Soft interior: The inside remains fluffy and tender
This contrast is what makes Hasselback potatoes one of the best oven-roasted potato recipes for home cooks and food lovers alike.
A Brief Look at Its Culinary Roots
The Hasselback potato originated in Sweden, where it was first prepared at a restaurant in Stockholm. Over time, it became popular worldwide due to its elegant presentation and simple preparation method.
Today, it’s a favorite in both home kitchens and fine dining settings because it combines comfort food with gourmet appeal.
Choosing the Right Potatoes for Best Results
The foundation of this recipe begins with selecting the right type of potato.
Best Option: Russet Potatoes
Russet potatoes are ideal because:
- High starch content creates a fluffy interior
- Thick skin crisps beautifully
- Oval shape works perfectly for slicing
Alternative: Yukon Gold
These offer:
- Slightly creamy texture
- Rich, buttery flavor
- Golden color
For best results, choose medium-sized potatoes that are similar in size to ensure even cooking.
Why Oil and Seasoning Matter
Oil is not just for flavor—it plays a key role in achieving crispiness.
- Helps heat transfer evenly
- Encourages browning
- Prevents drying out
A good quality olive oil works perfectly, but combining it with another fat like avocado oil can improve crisp texture even further.
Seasonings like garlic, rosemary, and thyme enhance aroma and depth, while salt and pepper bring balance.
The Secret Behind Perfect Crispiness
Achieving crispy edges depends on three important factors:
- Dry surface: Moisture prevents browning
- High initial heat: Starts the crisping process
- Proper spacing: Avoids steaming
These elements work together to create that golden, crunchy exterior everyone loves.
The Science of Cooking Potatoes
Understanding the cooking process helps you master this recipe:
- Starch gelatinization: Heat softens the interior
- Moisture evaporation: Creates crisp edges
- Maillard reaction: Produces golden color and flavor
When done correctly, you get the perfect balance of crispy and soft textures.
Step-by-Step Technique Overview
1. Preparing the Potato
Wash thoroughly and dry completely. A dry surface is essential for crispiness.
2. Creating a Flat Base
Slice a thin layer from the bottom so the potato sits stable.
3. Scoring the Potato
Place the potato between chopsticks or wooden spoons. Slice thin cuts across without cutting through completely.
This ensures uniform slices and prevents mistakes.
Flavor Infusion Techniques
To elevate flavor even more, you can:
- Brush seasoned oil between slices
- Add garlic pieces inside cuts
- Sprinkle herbs evenly
This ensures every bite is flavorful, not just the surface.
Two-Stage Baking Method for Best Results
This method guarantees perfect texture:
Stage 1: High Heat
Start baking at a higher temperature to begin crisping.
Stage 2: Lower Heat
Reduce temperature to cook the inside fully without burning the edges.
This combination creates evenly cooked, crispy potatoes.
Common Mistakes and How to Avoid Them
- Cuts too shallow: Prevents proper fanning
- Too much moisture: Leads to soggy texture
- Overcrowding pan: Causes steaming
- Skipping basting: Reduces crispiness
Attention to detail makes a big difference in the final result.
Creative Flavor Variations
Once you master the base recipe, you can experiment:
- Add cheese for a crispy topping
- Use spices for bold flavors
- Include herbs for freshness
- Try garlic butter for richness
These variations allow you to customize the dish without changing the core technique.
Serving Ideas
Hasselback potatoes pair well with many meals:
- Grilled chicken or steak
- Roasted vegetables
- Fresh salads
- Holiday dinners
They can also be served as a standalone snack with dips.
Storage and Reheating Tips
- Store leftovers in an airtight container in the fridge
- Reheat in oven for best crispiness
- Avoid microwaving if possible
This helps maintain texture and flavor.
Why This Recipe Is Worth Mastering
This dish teaches important cooking skills:
- Knife control
- Heat management
- Texture balance
It’s a simple recipe that builds confidence in the kitchen while delivering impressive results.
Final Thoughts
Hasselback potatoes prove that even the simplest ingredients can become extraordinary with the right technique. With crispy edges, fluffy interiors, and endless flavor possibilities, this recipe is a must-try for anyone who loves comfort food with a gourmet touch.
Part 2: Simple Hasselback Potato Recipe
Ingredients
- 4 medium Russet potatoes
- 2 tablespoons olive oil
- 2 cloves garlic (minced)
- 1 teaspoon dried rosemary
- 1 teaspoon dried thyme
- Salt (to taste)
- Black pepper (to taste)
- Fresh parsley (for garnish)
Instructions
Step 1: Preheat Oven
Preheat oven to 425°F (220°C).
Step 2: Prepare Potatoes
Wash and dry potatoes. Slice a thin base for stability.
Step 3: Slice Carefully
Place potato between chopsticks and cut thin slices without cutting through.
Step 4: Add Seasoning
Mix oil, garlic, herbs, salt, and pepper. Brush over potatoes and between slices.
Step 5: First Bake
Bake for 30 minutes.
Step 6: Baste and Continue Baking
Remove, brush again with oil, reduce heat to 400°F (200°C), and bake another 20–30 minutes.
Step 7: Finish and Serve
Garnish with fresh parsley and serve hot.