Ultimate Retro Lunch Lady Brownies: The Ultimate 4-Ingredient Cafeteria Hack
Part 1: The Ultimate Guide to Recreating School Cafeteria Magic at Home
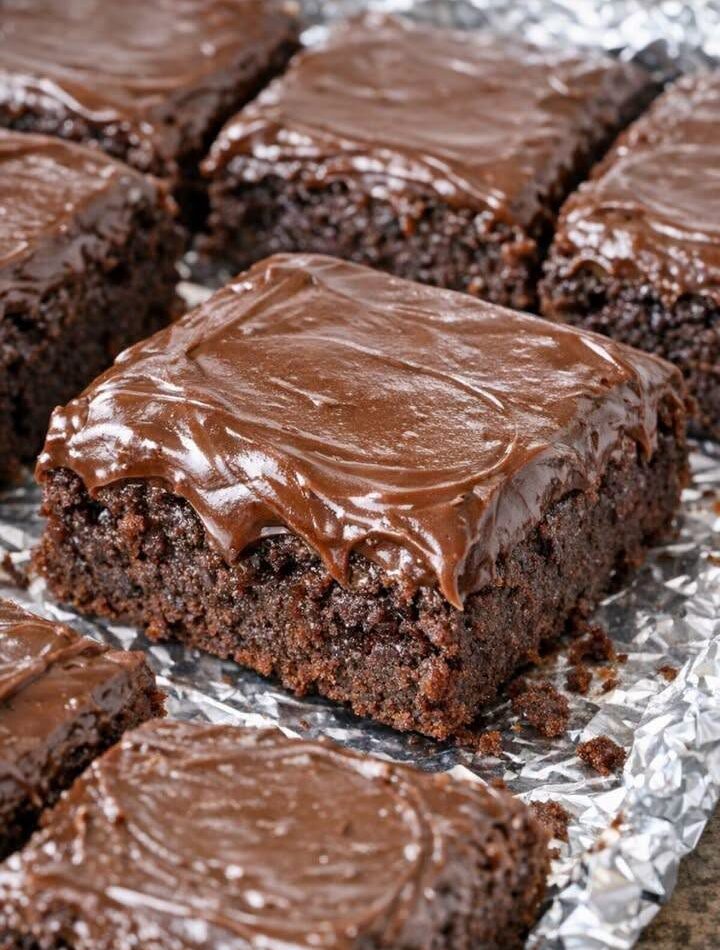
There are few culinary memories that evoke as much instant, joyful nostalgia as the classic Southern Lunch Lady Brownies. If you grew up eating school cafeteria lunches, you likely remember the unmistakable excitement of Friday afternoon menus. Long before gourmet bakeries and artisanal dessert bars dominated social media feeds, the school cafeteria served up pan treats that were pure magic. These weren’t your average dry, cake-like squares. Instead, they struck a legendary balance between a rich, dense fudge texture and a pillowy, cake-like crumb, all blanketed beneath a thick, shiny layer of warm chocolate glaze that melted the second it touched your tongue.
Recreating that specific taste and texture has long been a quest for home bakers. While authentic historical school lunch recipes were formulated in massive, industrial institutional batches—often requiring heavy-duty commercial mixers, giant sheet pans, and pounds of bulk commodity ingredients—we can achieve that exact, crave-able profile right in a standard home kitchen using a brilliant, streamlined shortcut.
Welcome to the ultimate guide for making foolproof, incredibly decadent, 4-ingredient cafeteria brownies. Whether you are looking to surprise your kids with an after-school treat that transports you back in time, or you simply want a ridiculously easy dessert that requires minimal cleanup, this comprehensive deep dive will walk you through every secret, tip, and technique to master this retro classic.
The Power of Nostalgia: Why School Lunch Desserts Hit Different
Human memory is deeply tied to sensory experiences, and food is one of the most powerful triggers we have. The school cafeteria was a social hub, a place of routine, and for many, a sanctuary of comfort food. Among the cardboard pizza slices, crinkle-cut fries, and mystery casseroles, the dessert tray stood out as a beacon of pure comfort.
The Evolution of the Cafeteria Brownie
Historically, school districts relied on commodity foods and standardized institutional recipes distributed by nutritional programs. These recipes were engineered to be cost-effective, crowd-pleasing, and durable enough to sit in warm holding cabinets or under plastic wrap for hours without drying out. The secret to their longevity and moisture wasn’t fancy artisanal chocolate; it was a specific fat-to-flour ratio, generous use of eggs for structural chewiness, and the brilliant technique of applying frosting to a hot pan straight out of the oven.
When you apply frosting to a warm pan of baked goods, something magical happens. The residual thermal energy causes the bottom layer of the frosting to melt slightly into the porous surface of the brownie, bonding the two layers together. Meanwhile, the top layer of the frosting forms a delicate, silky skin that seals in moisture. When cooled, this creates the iconic “bite” that defines a true Southern cafeteria brownie: a soft, glossy shell giving way to a rich, fudgy interior.
Decoding the 4-Ingredient Shortcut
To capture this exact flavor profile without spending hours measuring flour, cocoa powder, sugar, and baking powder from scratch, we turn to a masterclass in culinary efficiency. By utilizing a high-quality boxed brownie mix as our structural canvas and executing a few strategic ingredient swaps, we can bypass the guesswork while keeping the homemade taste completely intact.
1. The Brownie Mix Foundation (Family-Size Box, Approx. 18 oz)
- The Role: Acts as the structural base, providing the precise balance of flour, leavening agents, and deep cocoa foundation.
- The Selection: Opt for a standard “family-size” or 13×9-inch box of fudge brownie mix. Avoid ultra-chewy or mix-in-heavy variations (like walnut or caramel swirls) for the most authentic retro result. A classic milk chocolate or dark fudge base works best.
2. Melted Unsalted Butter (½ Cup / 1 Stick)
- The Secret Swap: Most standard boxed instructions instruct you to use vegetable oil and water. While oil keeps baked goods moist, it lacks flavor. By substituting the oil with an equal amount of melted unsalted butter, you introduce a rich, nutty, dairy-forward depth that completely transforms the flavor profile. Butter solidifies slightly as it cools, giving these brownies their dense, signature crumb.
3. Large Eggs (2 Large Eggs)
- The Role: Eggs provide structure, rise, and the necessary moisture balance. Using two large eggs binds the butter and dry mix into a thick, luxurious batter that holds its shape and bakes into a dense, fudgy masterpiece rather than a fluffy sponge cake.
4. Prepared Chocolate Frosting (1 Tub, 16 oz)
- The Finishing Touch: While homemade buttercream is wonderful, the authentic cafeteria experience relies on the uniform, ultra-smooth consistency of a tub of prepared milk chocolate or fudge frosting. Its specific chemical formulation allows it to melt evenly across a hot baking surface and reset into that signature glossy, sliceable glaze.
Pro-Tips for Maximizing Flavor and Texture
Even with a shortcut recipe, professional techniques can elevate your results from good to legendary. Consider these expert insights:
- Control Your Bake Time: The absolute cardinal rule of fudgy brownies is avoiding over-baking. Ovens vary wildly, so begin checking your pan at the 18-minute mark. You are looking for a toothpick inserted near the center to emerge with a few moist, fudgy crumbs attached—not wet batter, but certainly not clean. If the toothpick comes out completely dry, the brownies will turn out dry and cake-like.
- The Power of Parchment: Lining your baking pan with parchment paper with an overhang on the sides allows you to lift the entire chilled block of brownies out of the pan effortlessly. This guarantees pristine, restaurant-quality edges when it comes time to slice.
- The Temperature Control Rule: Never attempt to frost a cold or even room-temperature pan of brownies with this method. The frosting must go onto the hot pan straight from the oven so that the thermal transfer can create that seamless bond between cake and glaze.
Nutritional Awareness and Serving Suggestions
While these treats are undeniably an indulgence, understanding how to portion and serve them makes all the difference. Cutting the pan into neat squares ensures controlled portions, though it is notoriously difficult to eat just one!
Pairing Ideas for Maximum Nostalgia
- Ice-Cold Whole Milk: The ultimate companion. The milk’s fat content cuts through the rich, sweet chocolate glaze, resetting your palate between bites.
- Vanilla Bean Ice Cream: Serve a square slightly warmed in the microwave for 15 seconds alongside a scoop of high-quality vanilla bean ice cream for an elevated dessert experience.
- A Pinch of Flaky Sea Salt: If you want to bridge the gap between retro childhood nostalgia and modern gourmet baking, sprinkle a tiny pinch of flaky sea salt (such as Maldon) over the warm frosting just before it sets. The salt amplifies the chocolate notes exponentially.
Part 2: Recipe Card
Quick 4-Ingredient Southern Lunch Lady Brownies
These ultra-fudgy, retro-style brownies feature a rich buttery crumb and a signature melted chocolate glaze. They come together in minutes and deliver pure school-day nostalgia.
Prep time: 10 minutes | Bake time: 22 minutes | Cooling time: 60 minutes | Yields: 16-24 squares
Essential Ingredients
- 1 family-size box fudge brownie mix (approx. 18 oz)
- ½ cup (1 stick) unsalted butter, melted
- 2 large eggs (at room temperature)
- 1 tub (16 oz) prepared milk chocolate or fudge frosting
Step-by-Step Instructions
- Preheat and Prepare: Preheat your oven to 350°F (175°C). Line an 8×11-inch or 9×13-inch baking dish with parchment paper, or grease the interior thoroughly with nonstick cooking spray to ensure easy removal later.
- Mix the Thick Batter: In a large mixing bowl, combine the dry fudge brownie mix, the melted unsalted butter, and the two large eggs. Stir vigorously with a spatula or wooden spoon until just combined. Note that the batter will be noticeably thicker than standard box preparations; this extra density is the secret to authentic cafeteria texture.
- Bake to Fudgy Perfection: Spread the thick batter evenly into your prepared baking dish, smoothing the top with a spatula. Bake for 20 to 24 minutes. Test the center with a toothpick—it should emerge with a few moist crumbs attached. Take care not to overbake.
- Apply the Warm Glaze: Remove the pan from the oven immediately. Take your tub of prepared chocolate frosting and dollop spoonfuls evenly across the hot surface of the brownies. Let the pan sit undisturbed for 2 minutes to allow the residual heat to soften the frosting, then gently smooth it into a glossy, uniform layer using an offset spatula.
- Cool, Set, and Slice: Allow the brownies to cool completely at room temperature for roughly 1 hour so the glaze can set into its signature soft, fudge-like finish. For razor-sharp edges, pop the pan into the refrigerator for 20 minutes before slicing into neat squares with a clean knife.
Source
Adapted from classic institutional Southern school cafeteria baking traditions and modernized for home kitchens.