Creamy White Chocolate Peanut Ice Cream – A Rich No-Churn Frozen Dessert You’ll Love
A Luxurious Homemade Ice Cream Recipe Made with Simple Ingredients
There is something truly special about homemade ice cream. The smooth texture, rich flavor, and ability to customize every ingredient make it one of the most rewarding desserts you can prepare at home. This Creamy White Chocolate Peanut Ice Cream combines the richness of dairy, the sweetness of white chocolate, and the irresistible crunch of peanuts to create a frozen treat that tastes like it came from a premium ice cream shop.
Unlike many traditional ice cream recipes that require expensive equipment or complicated churning methods, this easy homemade ice cream recipe delivers incredible results with simple kitchen tools. The combination of milk, eggs, milk powder, sugar, condensed milk, and whipped cream creates a velvety base that freezes beautifully while maintaining a soft and creamy texture.
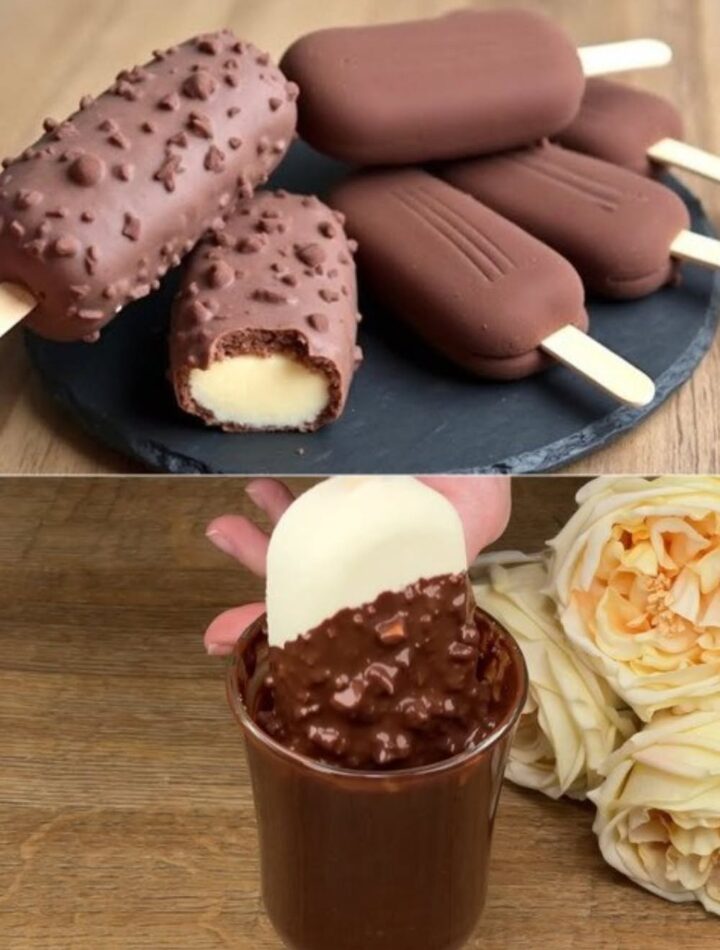
The finishing touch is a glossy chocolate shell made from melted chocolate and vegetable oil, topped with crushed peanuts for added crunch and flavor. Every spoonful offers a delicious contrast between creamy ice cream, rich chocolate, and nutty texture.
Whether you are making dessert for family gatherings, summer celebrations, birthdays, holidays, or simply treating yourself, this homemade frozen dessert is guaranteed to impress.
Why Homemade Ice Cream Continues to Be a Favorite Dessert
Store-bought ice cream is convenient, but homemade versions offer a level of freshness and flavor that is difficult to match.
Many people enjoy making homemade ice cream because it allows complete control over ingredients, sweetness, and texture.
Benefits include:
- Rich homemade flavor
- Creamy texture
- No special ice cream machine required
- Customizable toppings
- Family-friendly preparation
- Budget-friendly dessert option
- Perfect for special occasions
- Better ingredient control
This recipe combines all of those advantages into one easy-to-follow frozen dessert.
What Makes This White Chocolate Ice Cream So Special?
At first glance, the ingredient list may appear simple.
However, each component contributes something unique to the final dessert.
The milk and eggs form a rich custard-like base.
Milk powder increases creaminess and body.
Condensed milk adds sweetness and smooth texture.
White chocolate contributes richness and a subtle vanilla-like flavor.
Heavy cream creates a light and airy consistency.
The chocolate topping provides a satisfying snap, while peanuts add crunch and contrast.
Together, these ingredients create a frozen dessert that feels luxurious and indulgent.
The Secret Behind a Smooth and Creamy Ice Cream Base
One of the biggest challenges when making homemade ice cream is achieving a texture that is creamy rather than icy.
This recipe solves that problem through a carefully balanced combination of ingredients.
Milk
Milk provides the liquid foundation.
Its role includes:
- Creating structure
- Dissolving sugar
- Carrying flavor
- Supporting creaminess
Eggs
Eggs contribute richness and help stabilize the mixture.
Benefits include:
- Improved texture
- Enhanced creaminess
- Better mouthfeel
- Smoother consistency
Properly heating the eggs with the milk mixture creates a silky dessert base.
Whole Milk Powder
Milk powder is often an overlooked ingredient in homemade ice cream.
It helps:
- Increase creaminess
- Reduce ice crystals
- Improve texture
- Enhance dairy flavor
Many premium ice cream recipes rely on milk powder for these reasons.
Sugar
Sugar does more than sweeten.
It also:
- Improves texture
- Helps prevent excessive freezing
- Balances flavors
- Supports creaminess
Without enough sugar, homemade ice cream can become hard and icy.
Condensed Milk
Condensed milk adds concentrated sweetness and richness.
It helps create:
- Smoother texture
- Softer scoopability
- Rich flavor
- Creamy consistency
Its thick texture also contributes to the luxurious mouthfeel.
Why White Chocolate Works Perfectly in Ice Cream
White chocolate provides more than sweetness.
Because it contains cocoa butter, it contributes:
- Smooth texture
- Rich flavor
- Velvety mouthfeel
- Enhanced creaminess
The mild flavor complements the dairy ingredients beautifully.
Rather than overpowering the dessert, white chocolate adds subtle sweetness and richness throughout.
The Importance of Whipped Heavy Cream
Heavy cream is one of the most important components in this recipe.
When whipped properly, it introduces air into the mixture.
This creates:
- Light texture
- Better scoopability
- Creamy consistency
- Professional-quality results
The air trapped in the whipped cream helps prevent the ice cream from becoming dense and heavy.
Why Folding Matters
After whipping the cream, it is important to fold it gently into the cooled mixture.
Aggressive stirring can deflate the whipped cream.
Gentle folding preserves:
- Volume
- Airiness
- Creaminess
- Texture
This simple technique significantly improves the final result.
Creating the Perfect Chocolate Topping
The chocolate shell is one of the highlights of this dessert.
A simple combination of chocolate and vegetable oil creates a smooth coating that hardens beautifully when it touches the frozen ice cream.
Why Add Vegetable Oil?
The oil helps:
- Create a glossy finish
- Improve pourability
- Prevent overly hard chocolate
- Produce a cleaner crack when served
The result is a thin chocolate layer that complements the creamy ice cream beneath.
The Role of Crushed Peanuts
Peanuts provide more than decoration.
They contribute:
- Crunch
- Nutty flavor
- Texture contrast
- Visual appeal
The combination of creamy ice cream, crisp chocolate, and crunchy peanuts creates a satisfying dessert experience.
Perfect Occasions to Serve This Frozen Dessert
One of the greatest advantages of this recipe is its versatility.
Summer Gatherings
A refreshing dessert during warm weather.
Birthday Parties
A crowd-pleasing homemade treat.
Family Celebrations
Easy to prepare ahead of time.
Holiday Desserts
An elegant addition to dessert tables.
Weekend Indulgence
Perfect for satisfying sweet cravings.
Special Dinner Parties
A sophisticated frozen dessert option.
Tips for Achieving the Best Texture
Use Cold Heavy Cream
Very cold cream whips more efficiently and creates better volume.
Cool the Base Completely
Never mix whipped cream into a warm mixture.
Warm ingredients can deflate the whipped cream and affect texture.
Freeze Properly
Allow sufficient freezing time for the best consistency.
Although three hours is the minimum, overnight freezing often produces superior results.
Allow Slight Softening Before Serving
Removing the ice cream from the freezer 5–10 minutes before serving makes scooping easier.
Creative Flavor Variations
While the original recipe is wonderful, it can also serve as a foundation for creative variations.
Chocolate Lover’s Version
Use dark chocolate for the topping.
Nutty Deluxe
Add additional chopped peanuts between layers.
Fruit Fusion
Mix in:
- Strawberries
- Bananas
- Raspberries
Cookie Crunch
Fold in:
- Chocolate cookie crumbs
- Vanilla cookies
- Brownie pieces
Flavor Extract Enhancement
Add small amounts of:
- Vanilla extract
- Almond extract
These additions can personalize the recipe while preserving its original character.
Common Mistakes to Avoid
Overheating the Custard
The mixture should gently simmer, not boil aggressively.
Overheating can affect texture.
Skipping the Cooling Process
Warm custard can melt whipped cream and reduce volume.
Overmixing
Aggressive stirring can remove air from the whipped cream.
Insufficient Freezing Time
The dessert needs enough time to fully set.
Serving Directly from the Freezer
Allowing slight softening improves texture and scoopability.
Storage Guidelines
Proper storage helps maintain quality.
Freezer Storage
Store in an airtight container.
Recommended Storage Time
Best enjoyed within 2–3 weeks.
Prevent Freezer Burn
Keep the container tightly sealed.
Serving Tip
Allow several minutes at room temperature before scooping.
Nutritional Benefits
While this is certainly an indulgent dessert, it also contains valuable nutrients.
Protein
Provided by:
- Milk
- Eggs
- Cream
Calcium
Dairy ingredients contribute calcium.
Energy
Carbohydrates and fats provide energy and satisfaction.
Balanced Indulgence
Enjoyed in moderation, it can be part of a balanced lifestyle.
Frequently Asked Questions
Can I Use Alternative Milk?
Yes, almond milk or oat milk may be substituted, though texture may vary.
How Long Should It Freeze?
At least 3 hours, but overnight is recommended.
Can I Omit the Eggs?
Yes, though the texture may become less rich.
Why Is My Ice Cream Icy?
Excess water or insufficient fat content can contribute to ice crystal formation.
Can I Make It Dairy-Free?
Using dairy-free milk, dairy-free cream alternatives, and dairy-free chocolate can create a non-dairy version.
Final Thoughts
This Creamy White Chocolate Peanut Ice Cream is proof that homemade frozen desserts can rival premium ice cream shop creations. The rich dairy base, silky white chocolate flavor, crunchy peanut topping, and crisp chocolate shell combine to create a dessert that feels both elegant and comforting.
Whether you’re making it for a special occasion or simply treating yourself to something sweet, this easy no-churn ice cream recipe delivers incredible flavor, creamy texture, and impressive presentation. Once you make it, it may quickly become one of your favorite homemade desserts.
Part 2 Creamy White Chocolate Peanut Ice Cream
Recipe Information
| Detail | Time |
|---|---|
| Prep Time | 20 Minutes |
| Freeze Time | 3 Hours Minimum |
| Total Time | About 3 Hours 20 Minutes |
| Servings | 8 |
Ingredients
Ice Cream Base
- 1 cup (250 ml) milk
- 2 large eggs
- ⅓ cup (40 g) whole milk powder
- ⅓ cup (40 g) granulated sugar
- 2 tablespoons (40 g) sweetened condensed milk
- 3 ounces (80 g) white chocolate, chopped
- 1½ cups (350 g) cold heavy cream (33% fat)
Chocolate Peanut Topping
- 7 ounces (200 g) chocolate
- 1½ teaspoons (20 ml) vegetable oil
- ¼ cup (20 g) crushed peanuts
Instructions
Step 1: Prepare the Custard Base
In a saucepan, combine the milk, eggs, milk powder, sugar, condensed milk, and white chocolate.
Whisk thoroughly until smooth and fully blended.
Step 2: Cook the Mixture
Place the saucepan over low heat.
Stir continuously while heating until the mixture reaches a gentle simmer and begins to bubble lightly.
Remove from heat and allow it to cool completely to room temperature.
Step 3: Whip the Cream
In a separate chilled bowl, whip the cold heavy cream until stiff peaks form.
Step 4: Combine
Using a spatula, gently fold the whipped cream into the cooled milk mixture.
Mix carefully to preserve the airy texture.
Step 5: Freeze
Transfer the mixture into a freezer-safe container.
Freeze for at least 3 hours or until fully set.
Step 6: Make the Chocolate Coating
Place the chocolate and vegetable oil in a microwave-safe bowl.
Heat in 30-second intervals, stirring between each interval until smooth.
Step 7: Finish and Serve
Once the ice cream is frozen, drizzle the melted chocolate over the surface.
Sprinkle with crushed peanuts.
Serve immediately or return to the freezer until ready to enjoy.
Optional Flavor Enhancements
- Vanilla extract
- Almond extract
- Cookie crumbs
- Brownie pieces
- Chopped strawberries
- Banana slices
Storage Instructions
Freezer
Store in an airtight container for up to 2–3 weeks.
Serving
Let stand at room temperature for 5–10 minutes before scooping.
Helpful Notes
- Use very cold cream for maximum volume.
- Cool the milk mixture completely before combining.
- Fold gently to maintain a light texture.
- Do not overheat the custard base.
- Overnight freezing provides the best consistency.