Here’s a detailed, step-by-step guide to making no-knead garlic bread at home. This long-form version explains not just the how, but the why, so you can get bakery-quality results with minimal effort.
The Ultimate No-Knead Garlic Bread Recipe
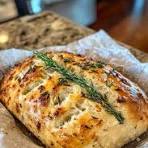
There’s something magical about fresh garlic bread: crisp golden crust, fluffy interior, buttery garlic aroma, and flecks of herbs in every bite. The best part? You don’t need to knead, use a mixer, or have advanced baking skills. Time does most of the work for you.
This recipe uses a slow fermentation method, which develops flavor naturally and creates that airy, artisan-style texture.
Why No-Knead Works
Traditional bread requires kneading to develop gluten—the network that traps air and gives bread structure. In no-knead bread, hydration and time replace kneading. The dough rests for many hours, allowing gluten strands to form on their own.
The result:
- Crisp crust
- Chewy, airy crumb
- Deep, developed flavor
- Minimal hands-on work
Ingredients
For the Dough
- 3 cups (375 g) all-purpose flour
- 1 ½ teaspoons salt
- ½ teaspoon instant yeast
- 1 ½ cups (360 ml) warm water (not hot)
For the Garlic Butter
- 4 tablespoons (60 g) unsalted butter, softened
- 3–4 cloves garlic, finely minced
- 1 tablespoon fresh parsley, chopped (or 1 teaspoon dried)
- ¼ teaspoon salt
- Optional: 2 tablespoons grated Parmesan
Equipment
- Large mixing bowl
- Wooden spoon or spatula
- Plastic wrap or towel
- Dutch oven or heavy oven-safe pot with lid
- Parchment paper
- Sharp knife
Step 1: Mix the Dough
In a large bowl, combine flour, salt, and yeast. Stir together.
Add warm water and mix with a spoon until a shaggy, sticky dough forms. It should look messy and wet—that’s perfect. Do not knead.
Cover the bowl tightly with plastic wrap or a towel.
Step 2: Let Time Do the Work
Leave the dough at room temperature for 12–18 hours.
During this time:
- The dough will double in size.
- Bubbles will form on the surface.
- It will look loose and airy.
This long rest is what builds flavor and structure.
Tip: If your kitchen is cold, place the bowl inside your oven (turned off) with the light on.
Step 3: Shape the Dough
Lightly flour a surface and gently scrape the dough out.
Fold it over itself 3–4 times to create shape. Don’t overwork it.
Form into a rough round loaf.
Place on parchment paper and let rest 30–45 minutes while your oven preheats.
Step 4: Preheat the Oven Properly
Place your Dutch oven (with lid) into the oven and preheat to 450°F (230°C) for at least 30 minutes.
A preheated pot creates steam when the dough goes in, giving you that crispy artisan crust.
Step 5: Bake the Bread
Carefully remove the hot Dutch oven.
Using the parchment paper as a sling, lower the dough into the pot.
Score the top with a sharp knife (an X or single slash works).
Cover and bake for 30 minutes.
Remove lid and bake another 10–15 minutes until golden brown.
The internal temperature should be about 200–210°F (93–99°C).
Cool on a rack for at least 30 minutes before slicing.
Step 6: Make the Garlic Butter
While the bread cools:
- Mix softened butter with minced garlic.
- Add parsley and salt.
- Stir in Parmesan if using.
For deeper flavor, you can gently sauté the garlic in butter for 1–2 minutes before mixing.
Step 7: Turn It Into Garlic Bread
Once the bread has cooled slightly:
Option 1 – Classic Garlic Bread Slices
- Slice the loaf halfway through (don’t cut fully through bottom).
- Spread garlic butter between slices and on top.
- Wrap loosely in foil.
- Bake at 375°F (190°C) for 10–15 minutes.
Option 2 – Garlic Toast
- Slice fully.
- Spread butter on each slice.
- Broil 2–3 minutes until bubbly and golden.
Option 3 – Pull-Apart Style
- Cut crosshatch pattern.
- Stuff butter inside cracks.
- Wrap and bake 15 minutes.
Flavor Variations
Cheesy Garlic Bread
Add:
- 1 cup shredded mozzarella
- Extra Parmesan on top
Bake uncovered for last 5 minutes to melt cheese.
Roasted Garlic Version
Roast a whole garlic bulb:
- Cut top off
- Drizzle with olive oil
- Wrap in foil
- Roast 400°F (200°C) for 35–40 minutes
Mash into butter for sweeter, mellow flavor.
Herb Garden Style
Add:
- Rosemary
- Thyme
- Basil
Fresh herbs give a fragrant Mediterranean touch.
Spicy Garlic Bread
Add:
- ½ teaspoon chili flakes
- Pinch cayenne
Perfect with pasta dishes.
Troubleshooting Guide
Dough Too Sticky?
It should be sticky. Avoid adding too much flour.
Dense Bread?
Possible causes:
- Dough didn’t ferment long enough
- Yeast expired
- Too much flour
Pale Crust?
Bake uncovered longer.
Garlic Burns Easily
If broiling, watch carefully. Garlic can burn in seconds.
Make-Ahead & Storage
Dough
- Can rest up to 24 hours.
- Refrigerate after first 12 hours if needed.
Baked Bread
- Store at room temperature 2 days.
- Freeze up to 3 months.
Garlic Butter
- Refrigerate 1 week.
- Freeze in small portions.
What to Serve With Garlic Bread
Garlic bread pairs beautifully with:
- Tomato soup
- Creamy Alfredo pasta
- Lasagna
- Grilled chicken
- Salads
It also makes amazing sandwiches the next day.
Why This Recipe Works
- High hydration = airy crumb
- Steam from Dutch oven = crispy crust
- Long fermentation = deeper flavor
- Fresh garlic butter = bold aroma
You’re essentially creating bakery-quality bread with almost no effort.
Quick Timeline Example
8:00 PM – Mix dough
Next Day 10:00 AM – Shape
10:30 AM – Bake
11:30 AM – Add garlic butter & serve
Pro Tips for Best Results
- Use fresh garlic, not jarred.
- Weigh flour if possible for accuracy.
- Don’t rush fermentation.
- Let bread cool before slicing (steam finishes cooking inside).
- Try olive oil instead of butter for dairy-free option.
Final Thoughts
No-knead garlic bread is one of the most rewarding homemade breads you can make. It looks impressive, tastes incredible, and requires very little effort.
Once you make it once, you’ll never go back to store-bought garlic bread again.
If you’d like, I can also provide:
- A faster 2-hour version
- A sourdough version
- Whole wheat variation
- Air fryer garlic bread
- Restaurant-style soft garlic knots
Just let me know 😊