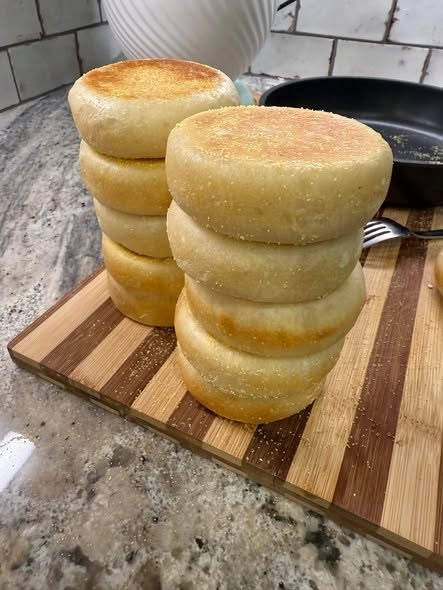
Ultimate Guide to Homemade Thermomix English Muffins: Why You Will Never Buy Store-Bought Again
There is an undeniable, comforting magic that comes from baking your own bread products at home, and when it comes to breakfast staples, nothing quite rivals the classic, rustic charm of a fresh English muffin. If you are someone who appreciates the finer details of a weekend breakfast spread, you already know that a great English muffin is defined by its signature texture—crisp and golden on the exterior, wonderfully soft and chewy on the inside, and riddled with those coveted nooks and crannies designed specifically to catch pools of melting butter. Unfortunately, the packaged varieties sitting on supermarket shelves often fall drastically short of this ideal. They can be overly dense, artificially preserved, rubbery, and completely lacking in that fresh-baked aroma that turns a simple morning routine into a culinary event.
Enter your trusty kitchen assistant: the Thermomix. By harnessing the precise temperature controls and powerful kneading capabilities of your device, transforming raw pantry ingredients into artisan-quality breakfast bread has never been easier or more foolproof. Whether you are a seasoned home baker or someone who has rarely ventured beyond basic packet mixes, this comprehensive guide will walk you through everything you need to know about crafting bakery-grade English muffins right in your own kitchen. From understanding the science of yeast activation to mastering the stovetop cooking technique, get ready to revolutionize your morning routine.
Why You Are Going to Fall in Love with This Recipe
Transitioning from commercially manufactured bread to homemade baked goods brings a multitude of benefits to your kitchen. Once you taste the difference for yourself, returning to store-bought options simply will not be an option.
- Zero Artificial Additives or Preservatives: Mass-produced breads rely heavily on chemical stabilizers, mold inhibitors, and artificial preservatives to extend shelf life on supermarket aisles. When you make your English muffins from scratch, every single ingredient is wholesome, recognizable, and entirely controlled by you. You will know precisely what goes into your family’s bodies.
- Unbeatable Economic Value and Pantry Simplicity: The ingredients required for this recipe are not exotic or expensive; they are everyday pantry staples that you most likely already have sitting in your cupboards and refrigerator. Making your own batch is remarkably cost-effective compared to buying specialty artisan packs from boutique bakeries.
- Incredible Versatility for Any Meal: While they are universally celebrated as a breakfast heavyweight, English muffins are remarkably flexible. They form the sturdy, absorbent foundation for classic Eggs Benedict, support smashed avocado with a squeeze of fresh lemon, act as the vehicle for savory bacon and egg sandwiches, or simply serve as a comforting afternoon snack slathered with rich butter, fruit jam, or peanut butter.
- Freezer-Friendly Meal Prep Champion: Life gets busy, but that does not mean you have to sacrifice quality food. This recipe yields a generous batch that freezes exceptionally well. Simply bake them, let them cool, slice them in half, and tuck them away in the freezer. When a craving strikes, pull a half straight from the freezer and pop it right into your toaster for an instant, hot, artisan breakfast.
- Universal Thermomix Compatibility: No matter which model of the appliance you currently own—whether it is the TM31, TM5, TM6, or the newer iterations—this recipe is meticulously calibrated to work seamlessly across all versions, guaranteeing consistent, delicious results every single time.
Mastering the Dough: Expert Proofing and Rising Strategies
The secret to achieving that wonderfully light, airy interior texture lies entirely in how well your dough rises. Yeast is a living organism that requires precise environmental conditions to thrive, metabolize sugars, and release the carbon dioxide gas pockets that give bread its structure. If you have ever struggled with dense, heavy, or stubborn dough that refuses to expand, adopting these expert environmental techniques will completely change your baking game.
Optimizing Your Proofing Environment
To encourage your dough to reach its maximum potential during the primary and secondary rises, keep these golden rules in mind:
- Grease Your Vessel Thoroughly: Always transfer your freshly mixed dough into a generously greased mixing bowl or a specialized ThermoServer. This not only traps heat efficiently but ensures the sticky dough releases effortlessly when it is time to shape your muffins.
- Trap the Heat and Moisture: If you are using a ThermoServer, secure the lid tightly to lock in ambient warmth and humidity. If you are using a standard glass or ceramic mixing bowl, drape a warm, damp tea towel tightly across the top to prevent the outer layer of the dough from drying out or forming a crust.
- Seek Out Micro-Climates: Yeast loves gentle, consistent warmth without harsh drafts. Find a cozy spot in your home to let your bowl rest for its designated hour—or until it has definitively doubled in size. Ideal locations include a sun-drenched windowsill, resting on top of a warm water bottle, or tucked inside your kitchen pantry away from drafty doorways.
- The Oven Trick (With Caution): Another reliable method is to turn your conventional oven on its lowest possible temperature setting for just one minute, turn it completely off, and then place your covered bowl or ThermoServer inside. Crucial Warning: Always double-check that the internal cavity is only mildly warm; if the oven is too hot, it will prematurely cook the outer edges of the dough or melt plastic components of your container.
Essential Kitchen Equipment
Having the right tools lined up before you begin ensures a smooth, stress-free cooking process from start to finish. Here is your checklist:
- Your Thermomix Unit: Complete with mixing bowl, blade assembly, and measuring cup lid.
- A Large Non-Stick Frying Pan or Griddle: Essential for achieving that traditional golden crust and par-cooking the muffins evenly on the stove top.
- Baking Trays or Cutting Boards: For resting and shaping your dough portions.
- A Round Pastry Cutter: Approximately 9cm in diameter to stamp out clean, uniform muffin shapes.
- Parchment Paper: To line your trays and prevent sticking during the secondary proof.
Comprehensive Ingredients List
Gather these fresh, high-quality ingredients before you begin your baking session. Note that while you can use standard pantry flour, using bread flour yields a slightly chewier, more authentic artisan texture due to its higher protein content.
- 2 teaspoons Dried Active Yeast (or alternatively, 30g of fresh baker’s yeast for an extra rich fermentation profile)
- 300g Full-Cream Milk (provides richness, tenderness, and optimal hydration for the crumb)
- 30g Caster Sugar (feeds the active yeast and balances the savory flavor profile)
- 30g Unsalted Butter (softened at room temperature to enrich the dough structure)
- 1 Large Egg (acts as a natural binder and adds structural stability)
- 1 pinch Fine Sea Salt (to strengthen gluten strands and enhance overall flavor)
- 540g Bread Flour or High-Protein Plain Flour (forms the sturdy framework of your muffins)
- Semolina or Polenta (for heavy dusting on your workspace, cutting board, and frying pan to create that iconic rustic exterior texture and prevent sticking)
Step-by-Step Thermomix Preparation Method
Phase 1: Activating the Yeast Culture
Begin by pouring the milk, caster sugar, and dried active yeast directly into your main Thermomix mixing bowl. Secure the lid with the measuring cup in place. Program your machine to heat the mixture for 2 minutes at 37°C on Speed 2. This gentle, body-temperature warmth creates the ultimate incubator environment to wake up the dormant yeast cells. Once the cycle finishes, let the mixture sit undisturbed for a few minutes until a light, bubbly, frothy layer forms across the surface, confirming your yeast is active and healthy.
Phase 2: Mixing and Kneading the Dough
Next, add the softened butter, large egg, sea salt, and your measured bread flour into the active yeast liquid. Give everything a quick incorporation pulse by mixing for 5 seconds on Speed 6. Stop the machine briefly to scrape down any flour clinging to the internal walls of the bowl using your spatula.
Once cleared, lock the lid back down and select the Interval / Knead function for 2 minutes. Important Note: The dough at this stage will appear quite wet, soft, and remarkably sticky. This high hydration level is intentional, as it guarantees a light, open-crumb structure rather than a dense, cake-like muffin. Resist the temptation to dump extra dry flour into the machine, trusting the process as the gluten network develops.
Phase 3: The First Proof
Carefully scrape your sticky, elastic dough out of the mixing bowl and transfer it into your pre-greased bowl or ThermoServer. Secure your lid or damp tea towel firmly over the top. Set the vessel aside in your chosen warm, draft-free micro-climate and allow the dough to rest and rise for approximately 1 hour, or until it has visibly doubled or tripled in physical volume.
Phase 4: Shaping the Muffins
Dust your clean kitchen benchtop or a large wooden cutting board liberally with semolina or polenta. Tip your beautifully risen, airy dough out onto the bed of semolina. Dust the top of the dough lightly with a little extra semolina to keep it from sticking to your rolling pin, then gently roll out the mass until it reaches an even thickness of roughly 3cm.
Using your 9cm round pastry cutter, press straight down without twisting to stamp out clean, uniform circular discs. Gather up any leftover dough scraps, gently press them back together, roll out once more, and cut out remaining muffins. You should yield approximately 8 robust, thick English muffins. Pro-tip: Make sure you do not roll the dough out too thinly; English muffins require substantial height to develop those classic internal split lines.
Phase 5: The Secondary Rise
Transfer your newly cut muffin rounds onto a baking tray or board that has also been heavily dusted with semolina or polenta to prevent them from adhering to the surface. Cover them loosely and leave them to rest for an additional 20 minutes. During this secondary phase, they will rise slightly more, developing the light, puffy cellular structure required for a great toast.
Phase 6: Stovetop Par-Cooking
Place your large non-stock frying pan or cast-iron griddle over medium-low heat. Sprinkle a generous dusting of semolina directly across the dry surface of the pan. Working in manageable batches to avoid overcrowding, transfer your muffin rounds into the warm skillet.
Cook the muffins slowly for 5 to 8 minutes on each side. Keep a close eye on the heat; you want the exterior to develop a gorgeous, golden-brown crust without scorching the flour before the center finishes cooking through. Because these muffins are quite thick, low and slow is the golden rule here. Once both sides are golden and cooked through, transfer them to a wire rack to cool completely.
Essential Recipe Notes, Storage, and Serving Suggestions
Expert Storage Protocols
- Room Temperature Storage: Once your homemade English muffins have cooled completely down to room temperature, store them inside an airtight container or a paper-lined bread bag on your pantry counter for up to 3 days.
- Freezing for Long-Term Enjoyment: To preserve freshness for weeks to come, slice your cooled muffins completely in half, stack them neatly, and place them into a freezer-safe bag or container for up to 3 months.
- Toasting Straight from Frozen: There is no need to spend time thawing your frozen muffins. Simply grab a frozen half straight from the bag and drop it directly into your household toaster for a quick, steaming-hot breakfast ready in minutes.
Creative Serving Inspirations
Elevate your breakfast table by pairing your freshly toasted English muffins with these delicious combinations:
- The Classic Breakfast Base: Slathered generously with salted European butter and your favorite homemade strawberry or raspberry jam.
- The Weekend Brunch Favorite: Toasted crisp, layered with crisp bacon strips, perfectly poached free-range eggs, and drizzled with creamy hollandaise sauce.
- The Savory Comfort: Spread with creamy avocado, a squeeze of fresh lime, cracked black pepper, and crumbled feta cheese.
Nutritional Profile (Per Serving)
- Calories: 326 kcal
- Carbohydrates: 56 g
- Protein: 11 g
- Fat: 6 g
- Saturated Fat: 3 g
- Cholesterol: 32 mg
- Sodium: 54 mg
- Potassium: 153 mg
- Fiber: 2 g
- Sugar: 6 g
Thermomix English Muffins (Quick Recipe)
Soft, chewy, and beautifully golden, homemade English muffins are surprisingly easy to make in your Thermomix. These classic breakfast breads are perfect toasted with butter and jam, stacked with eggs and bacon, or used for homemade breakfast sandwiches. With their signature nooks and crannies, they soak up melted butter like a dream.
Course & Timings
- Course: Breakfast
- Prep Time: 15 minutes
- Cook Time: 15 minutes
- Rising Time: 1 hour
- Total Time: 1 hour 30 minutes
- Servings: 8 serves
Ingredients List
- 2 tsp Dried active yeast (or 30g fresh yeast)
- 300 g Milk (full fat)
- 30 g Caster sugar
- 30 g Butter (room temperature)
- 1 large Egg
- 1 pinch Sea salt
- 540 g Bread flour or plain flour
- Semolina or polenta (for sprinkling and dusting)
Step-by-Step Method
- Activate the Yeast: Place the dried active yeast, milk, and caster sugar into the Thermomix bowl. Heat for 2 minutes at 37°C on Speed 2. Allow it to sit until frothy.
- Make the Dough: Add the softened butter, egg, sea salt, and bread flour. Mix for 5 seconds on Speed 6, scrape down the sides of the bowl, and then run on the Interval/Knead function for 2 minutes. (Note: The dough will feel very sticky).
- First Rise: Transfer the dough into a greased bowl or ThermoServer. Cover with a lid or damp tea towel and allow to rise in a warm, draft-free place for approximately 1 hour or until doubled in size.
- Shape the Muffins: Sprinkle semolina generously over a work surface. Turn the dough out and roll it out until it is roughly 3cm thick. Use a 9cm round pastry cutter to stamp out round circles, yielding about 8 thick English muffins.
- Secondary Proof: Place the cut muffins onto a tray sprinkled with extra semolina to prevent sticking. Let them rest and rise slightly for 20 minutes.
- Cook: Heat a large frying pan or griddle over medium-low heat and dust the surface with semolina. Cook the muffins in batches for 5 to 8 minutes on each side until golden brown and cooked through.
- Serve or Store: Cool completely, then store in an airtight container for up to 3 days or freeze for up to 3 months. To serve, cut in half and toast directly from fresh or frozen, topping with your favorite condiments or eggs.
Source: Adapted from traditional artisan baking techniques and optimized for Thermomix culinary preparation.