The Ultimate Guide to Making Old-School Creamy Pineapple Fluff
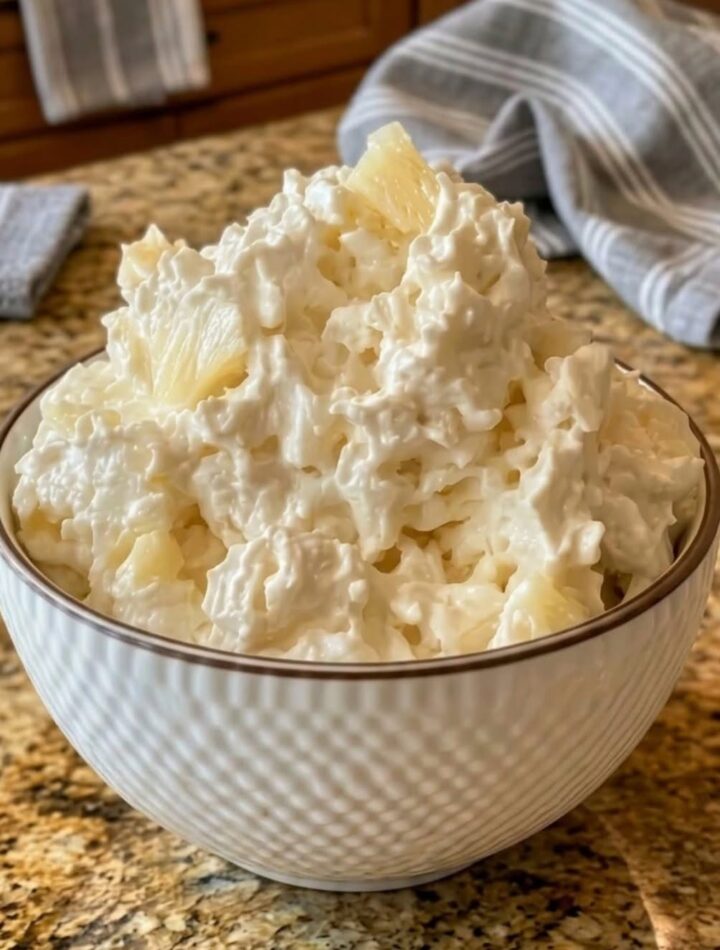
There is an undeniable, heartwarming nostalgia tied to vintage, no-bake comfort desserts. When a recipe combines sweetness, velvety creaminess, and an explosion of bright, tropical fruit flavor with virtually zero effort, it instantly earns a permanent spot in your kitchen rotation. Among these timeless classics, Creamy Pineapple Fluff reigns supreme as the ultimate crowd-pleasing dessert.
Whether you are assembling a quick weeknight treat for a family dinner, packing a cooling dish for a scorching summer barbecue, or adding a sweet, retro touch to a holiday potluck, this dessert delivers. It requires no oven, no complex equipment, and just a handful of simple pantry ingredients. After a brief chilling session in the refrigerator, you are rewarded with a light, airy, and spoonable creation that feels wonderfully refreshing and indulgent all at once.
Part 1: The Masterclass in Crafting Perfect Retro Fluff
To create a dessert that strikes the ideal balance between fluffy mousse and rich fruit salad, you must understand how the core components interact. Without baking to stabilize the structure, each element plays a critical functional role.
1. The Power of Undrained Crushed Pineapple
A common instinct in baking is to drain canned fruit to prevent sogginess. However, in this specific recipe, the liquid gold inside the can is your secret weapon. The pineapple juice provides the necessary moisture to hydrate and activate the instant pudding mix. As the starch in the pudding reacts with the juice, it thickens into a rich, custard-like base that holds the entire dessert together without tasting watery.
2. The Chemistry of Instant Pudding Mix
Instant vanilla pudding mix does more than just add a sweet, creamy background note. Its thickening agents chemically bind with the pineapple liquid and the moisture from the whipped topping. This creates a stable, cohesive matrix, ensuring your fluff stays spoonable and doesn’t separate into layers as it chills.
3. Folding vs. Stirring: Achieving Maximum Airiness
The signature “fluff” texture comes entirely from the whipped topping. When incorporating the whipped topping into your thickened pineapple base, technique matters immensely. You must use a gentle folding motion—cutting down the middle, sweeping around the bottom of the bowl, and folding the mixture over itself. Aggressive stirring will deflate the millions of tiny air bubbles trapped in the whipped topping, turning your airy cloud into a dense, heavy paste.
4. The Magic of the Chill Phase
Patience is the final ingredient. While you can technically eat pineapple fluff immediately, letting it rest in the refrigerator for at least one to two hours transforms the dish. During this cold rest, the mini marshmallows absorb a tiny bit of moisture, turning pillow-soft, while the flavors meld into a harmonious, tropical masterpiece.
Step-by-Step Culinary Blueprint: How to Create It
Step 1: Building the Tropical Base
In a large mixing bowl, combine your 20-ounce can of crushed pineapple (including the juice). Sprinkle the dry 3.4-ounce package of instant vanilla pudding mix directly over the fruit. Stir thoroughly until no dry pockets of powder remain.
Pro Baker’s Note: Allow this mixture to sit undisturbed for about 3 to 5 minutes. You will watch the pudding mix drink in the pineapple juices, transforming the liquid into a thick, luscious base.
Step 2: Incorporating the Cloud
Retrieve your completely thawed whipped topping. Add it to the bowl with your thickened pineapple base. Using a rubber spatula, gently fold the whipped topping into the mixture using slow, sweeping motions until a uniform, pale yellow color is achieved.
Step 3: Folding in the Mix-Ins
Now is the time to add your textural elements. Gently fold in your mini marshmallows, along with any optional shredded coconut or chopped pecans and walnuts if you are using them. Ensure they are evenly distributed throughout the bowl.
Step 4: The Refrigerated Rest
Cover your mixing bowl tightly with plastic wrap or a lid. Place it in the refrigerator for a minimum of 1 to 2 hours. If you are planning ahead, preparing this the morning of your event or even the night before makes serving effortless.
Step 5: Final Presentation
Just before bringing it to the table, give the fluff one gentle stir to refresh the texture. Spoon it into charming individual dessert bowls or present it proudly in a large glass trifle dish so guests can admire the layers. Top with a maraschino cherry or a tiny sprinkle of coconut for a polished finishing touch.
Pro Tips and Easy Customizations
- Always Thaw Your Whipped Topping: Ensure your frozen whipped topping is fully thawed in the refrigerator before folding it in. Icy patches will ruin the smooth consistency.
- Play With Pudding Flavors: While instant vanilla pudding is the classic choice, you can easily swap it out for white chocolate or cheesecake pudding mix for an even richer profile.
- Texture Variations: If you love crunch, toasted pecans or walnuts add a fantastic contrast to the pillowy marshmallows and soft pineapple.
Part 2: Quick Recipe Card
Classic Creamy Pineapple Fluff
Prep time: 10 minutes | Chill time: 1-2 hours | Servings: 6-8
Ingredients
- 1 can (20 ounces) crushed pineapple (undrained)
- 1 package (3.4 ounces) instant vanilla pudding mix
- 1 container (8 ounces) whipped topping, completely thawed
- 1 cup mini marshmallows
- 1/2 cup sweetened shredded coconut (optional)
- 1/2 cup chopped pecans or walnuts (optional)
- Maraschino cherries (for garnish)
Instructions
- Mix Base: In a large bowl, stir together the undrained crushed pineapple and the instant vanilla pudding mix. Let sit for 3-5 minutes until it begins to thicken.
- Fold Whipped Topping: Gently fold the thawed whipped topping into the pineapple mixture until smooth and airy, taking care not to deflate it.
- Add Mix-Ins: Fold in the mini marshmallows, shredded coconut, and chopped nuts until evenly distributed.
- Chill: Cover the bowl tightly and refrigerate for at least 1 to 2 hours to allow the flavors to blend and the marshmallows to soften.
- Serve: Give a quick gentle stir, scoop into serving dishes, garnish with a cherry, and enjoy cold!
Source: Adapted from traditional mid-century American comfort dessert recipes.